
自迁移出 MediaWiki 以来,本页内容尚未经过审查。如果您愿意帮忙,请查看帮助指南!
This page is a copy of Jython Scripting. The original wiki page is in a rewrite progress. When rewriting Jython Scripting is finished, this wiki page will be shortened to only contain Jython code examples.
Jython是一个实现 Python programming language设计运行于 Java 平台。
快速入门
- 按[调出Script Editor。
- 从 Templates › [by language] › Python 菜单中选择示例 Jython 脚本。
- 按⌃ Ctrl + R运行脚本!
Jython 解释器插件
解释器提供屏幕和提示。在提示符下键入任何 jython 代码以与 ImageJ 交互。
从Plugins › Scripting › Jython Interpreter启动它。有关所有按键绑定,请参阅Scripting Help,另请参阅Scripting comparisons。

Note that ImageJ also ships a unified Script Interpreter plugin, accessible from Plugins › Scripting › Script Interpreter. But it is currently beta quality, and the Python language does not work properly due to bugs. Once this issue is fixed, the unified Script Interpreter will replace the language-specific interpreters such as the Jython Interpreter.
在解释器中,所有 ImageJ、java.lang.* 和 TrakEM2 类都会自动导入。因此,创建新图像并对其进行操作非常简单。
语言基础知识
- # 之后的任何文本都会被注释掉。
- 没有行终止符(例如其他语言中的“;”),也没有花括号来定义代码块。
- 缩进定义代码块。
- 函数用
def定义,类用class定义。 - 函数是对象,因此可以存储在变量中。
- Jython(以及一般的Python)接受过程代码和面向对象代码的混合。
- Jython 目前实现了 Python 语言的 2.5 版本。所有 documentation for python 2.5 适用于与 Fiji 捆绑的 Jython(稍后列出备注)。
导入类
要从 Jython 中引用 Java 类,您需要导入它们。

You can specify imports in Jython as follows:
from java.io import File
Where java.io.File is the class to be imported. See also section Importing other .py scripts (modules) for importing user python modules.
Workflow for creating Jython scripts
To create a script for the GUI, the recommended setup is the following:
- Edit and save a file in your favorite text editor. If you want ImageJ 1.x to insert it into the Menu structure, the file must be saved somewhere under ImageJ plugins folder, have an underscore on the name, and a .py extension.
- Run Plugins › Scripting › Refresh Jython scripts only the very first time after newly creating the file under any folder or subfolder of ImageJ’s plugins folder. A menu item will appear with its name, from which it can be run.
- 继续从编辑器编辑(并保存)文件。只需选择菜单项即可反复执行。或者使用Plugins › Utilities › Find Commands…窗口轻松启动它(键绑定“l”)。
下次运行 Fiji 时,它将在插件菜单中设置所有脚本。
如果您只需要一个在无头模式下运行的脚本,只需执行以下操作:
fiji --headless filepath.py
Jython 的一些限制
尽管 Jython 试图尽可能接近 Python,但仍有一些问题 您在编写脚本期间可能会遇到的差异。
- 浮点“特殊数字”如*NaN*和*Inf*不被处理。
例如,
a = float('nan')
将在 python 中创建正确的浮点数,但会在 jython 中抛出异常。
相反,要在 jython 中创建 NaN,请使用:
>>> a = Double.NaN
>>> print a
NaN
要测试数字是否为 NaN:
>>> if Double.isNaN(a):
        print "a is NaN!"
a is NaN!
- 一些现有的Python模块无法在jython中导入。
例如模块 numpy 的情况,它对于分析数据和结果来说非常方便。
但是请参阅这些java数值库:http://math.nist.gov/javanumerics/#libraries,其中:
:* JaMa(Java 矩阵包)
:* Java3D(特别是其vecmath包提供通用矩阵和向量类(GMatrix、GVector)。
…已包含在斐济境内。
- 您的 Jython 版本可能与比您预期的旧得多的 Python 版本相匹配。
最新的 Jython 稳定版本(截至 2015 年 5 月)是 2.7.0。斐济(截至 2015 年 12 月)分发 Jython 2.5.3。任何最新的 Python 语法(例如 except ExceptionType as e: 或 with open(filepath, 'r') as f:)都会失败。
ImageJ 的 Jython 教程
定义变量:获取当前图像
imp = IJ.getImage()
这与以下内容相同:
imp = WindowManager.getCurrentImage()
由于调用上面的方法又长又乏味,因此可以声明一个指向上述静态方法的变量:
c = WindowManager.getCurrentImage
上面注意缺少括号。
要执行该函数,只需在其上使用括号即可:
imp = c()
上面获取了 c 的值,即 WindowManager 类中名为 getCurrentImage 的方法,并执行它,并将其返回的对象存储在imp中。
操作像素
创建灰度渐变图像
首先创建一个图像并获取其像素:
imp = ImagePlus("my new image", FloatProcessor(512, 512))
pix = imp.getProcessor().getPixels()
数组的长度:
n_pixels = len(pix)
然后循环修改它们:
# catch width
w = imp.getWidth()

# create a ramp gradient from left to right
for i in range(len(pix)):
   pix[i] = i % w

# adjust min and max, since we know them
imp.getProcessor().setMinAndMax(0, w-1)
…并显示新图像:
imp.show()
创建随机 8 位图像
首先导入必要的包:Random,来自标准 java util 库,以及 jarray,用于本机 java 数组的 Jython 模块:
from java.util import Random
from jarray import zeros
然后创建数组并用随机字节填充它:
width = 512
height = 512

pix = zeros(width * height, 'b')
Random().nextBytes(pix)
(’z’ = 布尔型、’c’ = 字符型、’b’ = 字节型、’h’ = 短型型、’i’ = int 型、’l’ = 长型型、’f’ = 浮点型、’d’ = 双精度型,如 jarray documentation 中所述。)
现在为 8 位图像创建一个新的 IndexColorModel(这就是 ImageJ 的 ij.process.LUT 类):
channel = zeros(256, 'b')
for i in range(256):
    channel[i] = (i -128)
cm = LUT(channel, channel, channel)
…并从像素组成一个 ByteProcessor,并将其分配给 ImagePlus:
imp = ImagePlus("Random", ByteProcessor(width, height, pix, cm))
imp.show()
创建随机图像,简单的方法
以上所有内容可以总结如下:
from java.util import Random
imp = IJ.createImage("A Random Image", "8-bit", 512, 512, 1)
Random().nextBytes(imp.getProcessor().getPixels())
imp.show()
在图像上运行分水岭插件
# 1 - Obtain an image
blobs = IJ.openImage("https://imagej.net/ij/images/blobs.gif")
# Make a copy with the same properties as blobs image:
imp = blobs.createImagePlus()
ip = blobs.getProcessor().duplicate()
imp.setProcessor("blobs copy", ip)

# 2 - Apply a threshold: only zeros and ones
# Set the desired threshold range: keep from 0 to 74
ip.setThreshold(147, 147, ImageProcessor.NO_LUT_UPDATE)
# Call the Thresholder to convert the image to a mask
IJ.run(imp, "Convert to Mask", "")

# 3 - Apply watershed
# Create and run new EDM object, which is an Euclidean Distance Map (EDM)
# and run the watershed on the ImageProcessor:
EDM().toWatershed(ip)

# 4 - Show the watersheded image:
imp.show()
包含分水岭的 EDM 插件可能已间接应用于当前活动的图像,但不推荐:
imp = IJ.getImage()  # the current image
imp.getProcessor().setThreshold(174, 174, ImageProcessor.NO_LUT_UPDATE)
IJ.run(imp, "Convert to Mask", "")
IJ.run(imp, "Watershed", "")
如果您在任何早期阶段都在图像上调用了 show(),只需使用以下命令更新屏幕:
imp.updateAndDraw()
…计算颗粒并测量它们的面积
继续上面的imp,其中包含现在分水岭的“斑点”示例图像:
# Create a table to store the results
table = ResultsTable()
# Create a hidden ROI manager, to store a ROI for each blob or cell
roim = RoiManager(True)
# Create a ParticleAnalyzer, with arguments:
# 1. options (could be SHOW_ROI_MASKS, SHOW_OUTLINES, SHOW_MASKS, SHOW_NONE, ADD_TO_MANAGER, and others; combined with bitwise-or)
# 2. measurement options (see https://imagej.net/ij/developer/api/ij/measure/Measurements.html)
# 3. a ResultsTable to store the measurements
# 4. The minimum size of a particle to consider for measurement
# 5. The maximum size (idem)
# 6. The minimum circularity of a particle
# 7. The maximum circularity
pa = ParticleAnalyzer(ParticleAnalyzer.ADD_TO_MANAGER, Measurements.AREA, table, 0, Double.POSITIVE_INFINITY, 0.0, 1.0)
pa.setHideOutputImage(True)

if pa.analyze(imp):
  print "All ok"
else:
  print "There was a problem in analyzing", blobs

# The measured areas are listed in the first column of the results table, as a float array:
areas = table.getColumn(0)
要打印每个区域的面积测量值:
>>> for area in areas: print area
76.0
185.0
658.0
434.0
...
现在,我们要测量每个粒子的强度。为此,我们将从 ROIManager 检索 ROI,在变量 blobs 中存储的原始(非分水岭、非阈值)图像上一次设置一个 ROI,然后测量:
# Create a new list to store the mean intensity values of each blob:
means = []

for roi in RoiManager.getInstance().getRoisAsArray():
  blobs.setRoi(roi)
  stats = blobs.getStatistics(Measurements.MEAN)
  means.append(stats.mean)
最后读出每个斑点的测量平均强度值及其面积:
for area, mean in zip(areas, means):
  print area, mean
6.0 191.47368421052633
185.0 179.2864864864865
658.0 205.61702127659575
434.0 217.32718894009216
477.0 212.1425576519916
...
从文本文件创建图像
包含 4 列行的数据文件:
...
399 23 30 10.12
400 23 30 12.34
...
…其中列是图像中每个像素的 X、Y、Z 和值。我们假设我们知道图像的宽度和高度。根据此类数据,我们创建一个图像,读出所有行并解析数字:
width = 512
height = 512
stack = ImageStack(width, height)

file = open("/home/albert/Desktop/data.txt", "r")

try:
  fp = FloatProcessor(width, height)
  pix = fp.getPixels()
  cz = 0
  # Add as the first slice:
  stack.addSlice(str(cz), fp)
  # Iterate over all lines in the text file:
  for line in file.readlines():
    x, y, z, value = line.split(" ")
    x = int(x)
    y = int(y)
    z = int(z)
    value = float(value)
    # Advance one slice if the Z changed:
    if z != cz:
      # Next slice
      fp = FloatProcessor(width, height)
      pix = fp.getPixels()
      stack.addSlice(str(cz), fp)
      cz += 1
    # Assign the value:
    pix[y * width + x] = value
  # Prepare and show a new image:
  imp = ImagePlus("parsed", stack)
  imp.show()
# Ensure closing the file handle even if an error is thrown:
finally:
  file.close()
获取/查看图像的直方图和测量值
最简单的方法是抓取图像并调用 ImageJ 命令来显示其直方图:
imp = IJ.openImage("https://imagej.net/ij/images/blobs.gif")
IJ.run(imp, "Histogram", "")
ImageJ 在内部是如何做到这一点的,与 ImageStatisics 类有关:
stats = imp.getStatistics()
print stats.histogram

array('i',[0, 0, 0, 0, 0, 0, 0, 0, 53, 0, 0, 0, 0, 0, 0, 0, 304,
           0, 0, 0, 0, 0, 0, 0, 1209, 0, 0, 0, 0, 0, 0, 0, 3511, 0,
           0, 0, 0, 0, 0, 0, 7731, 0, 0, 0, 0, 0, 0, 0, 10396, 0, 0,
           0, 0, 0, 0, 0, 7456, 0, 0, 0, 0, 0, 0, 0, 3829, 0, 0, 0,
           0, 0, 0, 0, 1992, 0, 0, 0, 0, 0, 0, 0, 1394, 0, 0, 0, 0,
           0, 0, 0, 1158, 0, 0, 0, 0, 0, 0, 0, 1022, 0, 0, 0, 0, 0,
           0, 0, 984, 0, 0, 0, 0, 0, 0, 0, 902, 0, 0, 0, 0, 0, 0,
           0, 840, 0, 0, 0, 0, 0, 0, 0, 830, 0, 0, 0, 0, 0, 0, 0,
           926, 0, 0, 0, 0, 0, 0, 0, 835, 0, 0, 0, 0, 0, 0, 0, 901,
           0, 0, 0, 0, 0, 0, 0, 1025, 0, 0, 0, 0, 0, 0, 0, 1180, 0,
           0, 0, 0, 0, 0, 0, 1209, 0, 0, 0, 0, 0, 0, 0, 1614, 0, 0,
           0, 0, 0, 0, 0, 1609, 0, 0, 0, 0, 0, 0, 0, 2220, 0, 0, 0,
           0, 0, 0, 0, 2037, 0, 0, 0, 0, 0, 0, 0, 2373, 0, 0, 0, 0,
           0, 0, 0, 1568, 0, 0, 0, 0, 0, 0, 0, 1778, 0, 0, 0, 0, 0,
           0, 0, 774, 0, 0, 0, 0, 0, 0, 0, 1364, 0, 0, 0, 0, 0, 0, 0])
默认情况下计算直方图、面积和平均值。需要指定其他值(例如中位数)。
要计算其他参数,请通过按位或组合指定它们(请参阅Measurements中的标志):
stats = imp.getStatistics(Measurements.MEAN |Measurements.MEDIAN |Measurements.AREA) 打印“平均值:”,stats.mean,“中位数:”,stats.median,“面积:”,stats.area
mean: 103.26857775590551 median: 64.0 area: 65024.
如果我们为图像设置 ROI,那么我们仅测量 ROI 的内部。这里我们设置一个半径为 25 像素的椭圆形 ROI,居中:
半径 = 25 roi = OvalRoi(imp.width/2 - 半径, imp.height/2 -半径, 半径2, 半径2) imp.setRoi(roi) stats = imp.getStatistics(Measurements.MEAN |Measurements.MEDIAN |Measurements.AREA) 打印“平均值:”,stats.mean,“中位数:”,stats.median,“面积:”,stats.area
mean: 104.96356275303644 median: 64.0 area: 1976.0
要自己显示直方图窗口,我们可以使用 HistogramWindow 类:
hwin = HistogramWindow(imp)
…我们可以抓取图像(绘图本身)并保存它:
plotimage = hwin.getImagePlus()
IJ.save(plotimage, "/path/to/our/folder/plot.tif")
消除从一个通道到另一个通道的出血
使用的技术是将一个通道除以另一个通道:要降噪的通道除以渗透的通道。
相对高级的方法是分割通道并使用“Divide”参数调用 ImageCalculator:
1 - 获取 RGB 图像堆栈
imp = WindowManager.getCurrentImage()
if imp.getType() != ImagePlus.COLOR_RGB:
  IJ.showMessage("The active image is not RGB!")
  raise RuntimeException("The active image is not RGB!")

if 1 == imp.getNSlices():
  IJ.showMessage("Not a stack!")
  raise RuntimeException("Not a stack!")
2 - 准备堆栈来分割切片
stack = imp.getStack()
red_stack = ImageStack(imp.width, imp.height)
green_stack = ImageStack(imp.width, imp.height)
3 - 迭代所有切片 - 注意切片为 1<=i<=size
for i in range(1, imp.getNSlices()+1):
  slice = stack.getProcessor(i)
  red_stack.addSlice(str(i), slice.toFloat(0, None))
  green_stack.addSlice(str(i), slice.toFloat(1, None))
4 - 通过 ImageCalculator 将“divide”应用到 red_stack,这是一个新的 32 位堆栈
不要在参数字符串中使用参数“create”或“float”或“32”
calc.calculate 调用——那么操作的结果将是
在一个超出我们控制范围的新堆栈中。没有他们,结果是
应用于 red_stack
calc = ImageCalculator()
calc.calculate("Divide stack", ImagePlus("red", red_stack), ImagePlus("green", green_stack))
5 - 组成一个新的颜色堆栈
new_stack = ImageStack(imp.width, imp.height)
for i in range(1, imp.getNSlices()+1):
  cp = stack.getProcessor(i).duplicate()
  cp.setPixels(0, red_stack.getProcessor(i))
  new_stack.addSlice(stack.getSliceLabel(i), cp)
6 - 显示新图像
ImagePlus("Normalized " + imp.title, new_stack).show()
或者,作为直接像素操作的示例,我们将迭代图像堆栈的所有切片,将红色通道除以绿色通道,并组成一个新堆栈:
1 - 获取 RGB 图像堆栈
imp = WindowManager.getCurrentImage()
if imp.getType() != ImagePlus.COLOR_RGB:
  IJ.showMessage("The active image is not RGB!")
  raise RuntimeException("The active image is not RGB!")

if 1 == imp.getNSlices():
  IJ.showMessage("Not a stack!")
  raise RuntimeException("Not a stack!")

stack = imp.getStack()
2 - 创建一个新的堆栈来存储结果
new_stack = ImageStack(imp.width, imp.height)
3 - 迭代所有切片 - 注意切片为 1<=i<=size
for i in range(1, imp.getNSlices()+1):
  # Get the slice i
  slice = stack.getProcessor(i)
  # Get two new FloatProcessor with the green and red channel data in them
  red = slice.toFloat(0, None)
  green = slice.toFloat(1, None)
  pix_red = red.getPixels()
  pix_green = green.getPixels()
  # Create a new FloatProcessor for the normalized result
  new_red = FloatProcessor(imp.width, imp.height)
  pix_new_red = new_red.getPixels()
  # Iterate and set all normalized pixels
  for k in range(len(pix_red)):
    if 0 != pix_green[k]:
      pix_new_red[k] = pix_red[k] / pix_green[k]
  # Create a ColorProcessor that has the normalized red and the same green and blue channels
  cp = slice.duplicate()
  cp.setPixels(0, new_red)   # at channel 0, the red
  # Store the normalized slice in the new stack, copying the same slice label
  new_stack.addSlice(stack.getSliceLabel(i), cp)
4 - 显示标准化堆栈
new_imp = ImagePlus("Normalized " + imp.title, new_stack)
new_imp.show()
请注意,第二种方法要慢得多:从 jython 访问每个像素的成本很高。如果您想进行非常快速的像素级操作,请使用 java 或 Clojure。
减去图像的最小值
也就是说,平移直方图,使最小值为零。
# Obtain current image and its pixels
imp = IJ.getImage()
pix = imp.getProcessor().convertToFloat().getPixels()

# find out the minimal pixel value
min = reduce(Math.min, pix)

# create a new pixel array with the minimal value subtracted
pix2 = map(lambda x: x - min, pix)

ImagePlus("min subtracted", FloatProcessor(imp.width, imp.height, pix2, None)).show()
注意我们使用了:
reduce函数通过将函数应用于每对连续值(在本例中为 Math.min),从值列表(像素数组)中获取单个值。lambda,用于声明一个带有一个参数的匿名函数。map函数,它运行一个作为列表中每个元素(这里是每个像素)的参数给出的函数,并返回一个包含所有结果的新列表。
提取合成图像给定时间范围内的特定颜色通道
假设您有一个 4D 多色图像,并且想要获取与特定颜色通道和时间帧相对应的一堆切片。
CompositeImage 是一个堆栈,其切片被解释为属于特定颜色通道、Z 切片和时间帧。要找出哪个切片对应于什么,请使用 ImagePlus 的 getStackIndex 方法,该方法在颜色通道、z 切片和时间帧之间转换为底层 ImageStack 中的切片索引。
from ij import IJ, ImagePlus, ImageStack

def extractChannel(imp, nChannel, nFrame):
 """ Extract a stack for a specific color channel and time frame """
 stack = imp.getImageStack()
 ch = ImageStack(imp.width, imp.height)
 for i in range(1, imp.getNSlices() + 1):
   index = imp.getStackIndex(nChannel, i, nFrame)
   ch.addSlice(str(i), stack.getProcessor(index))
 return ImagePlus("Channel " + str(nChannel), ch)

imp = IJ.getImage()
extractChannel(imp, 1, 1).show()
请注意,颜色通道、堆栈切片和时间帧都是从 1 开始的。例如,如果您有 3 个颜色通道,则它们的索引为 1、2 和 3(而不是 0、1 和 2)。
在单个复合多色图像堆栈中可视化任意数量的 TIFF 堆栈
假设您有 1000 堆“果蝇”果蝇大脑,每个大脑都有不同的神经元,用单一颜色通道标记。假设您已经注册了所有这些共焦堆栈。如果你将它们重叠,你会看到标记的神经元在 3D 空间中是否重叠。
这是一个执行此操作的脚本。首先,它要求一个包含任意数量的 TIF 图像堆栈的目录。它假设所有堆栈具有相同的尺寸,并且它们都是单通道(即仅红色,或仅绿色等)。然后,它会显示一个小窗口,其中列出了多种颜色:红色、绿色、蓝色、橙色、灰色等。目录中数百个堆栈中的任何一个都可以分配给每个颜色通道。
堆栈以虚拟方式访问,因此即使是 1000(一千)个堆栈也可以在小型笔记本电脑中很好地管理。
人们可以轻松添加更多颜色通道。但已经有很多了。
该脚本使用 Imglib 脚本来标准化图像并生成颜色合成。请参阅第 imglib scripting tutorial 以获得深入的解释。
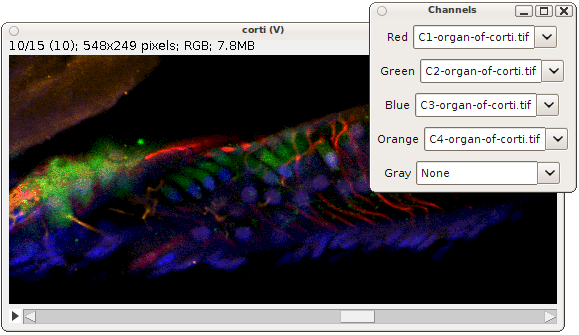
# 2010-12-03 Albert Cardona and Arnim Jenett
# At HHMI Janelia Farm, Fiji tutorials class
#
# Select a directory with multiple image stacks
# all of the same dimensions, and show a channel
# chooser window to visualize up to 5 of them
# in red, green, blue, orange, and gray.
#
# The stacks are all virtual, opened via LOCI
# with BFVirtualStack. The composition of the
# RGB ColorProcessor is done with the
# script.imglib library.
#
# Each color channel is shown normalized.
# Currently works only with TIF stacks,
# and it will interpret them as single-channel.


from loci.plugins.util import BFVirtualStack
from loci.formats import ChannelSeparator
from ij.io import DirectoryChooser
import os
from javax.swing import JScrollPane, JPanel, JComboBox, JLabel, JFrame
from java.awt import Color, GridLayout
from java.awt.event import ActionListener
from script.imglib.math import Compute, Max, Multiply
from script.imglib.algorithm import Normalize
from script.imglib.color import Red, Green, Blue, RGBA
from mpicbg.imglib.image.display.imagej import ImageJFunctions as IJF


# Choose a directory with lots of tif stacks
dc = DirectoryChooser("Choose directory with stacks")
srcDir = dc.getDirectory()

# Open each tif stack as a virtual BFVirtualStack
bfvs = []
names = []
for filename in os.listdir(srcDir):
  if filename.endswith(".tif"):
    print "Reading metadata from", filename
    cs = ChannelSeparator()
    names.append(filename)
    cs.setId(srcDir + filename)
    bfvs.append( BFVirtualStack(srcDir + filename, cs, False, False, False) )

names.sort()
names = ["None"] + names


colorToRGB = {
'Red' : [255,0,0],
'Green' : [0,255,0],
'Blue' : [0,0,255],
'Orange' : [255,127,0],
'Cyan' : [0,255,255],
'Yellow' : [255,255,0],
'Magenta' : [255,0,255],
'Indigo' : [75,0,130],
'Violet' : [238,130,238],
'Greyscale' : [255,255,255],
'Aquamarine' : [127,255,212],
'Navy Blue' : [0,0,128],
'Sky Blye' : [135,206,235],
'Turquoise' : [64,224,208],
'Beige' : [245,245,220],
'Brown' : [165,42,42],
'Chocolate' : [210,105,30],
'Dark wood' : [133,94,66],
'Light wood' : [133,99,99],
'Olive' : [128,128,0],
'Green yellow' : [173,255,47],
'Sea green' : [32,178,170],
'Khaki' : [240,230,140],
'Salmon' : [250,128,114],
'Pink' : [255,192,203],
'Tomato' : [255,99,71],
'Scarlet' : [140,23,23],
'Purple' : [128,0,128],
'Wheat' : [245,222,179],
'Silver grey' : [192,192,192]
}

# Encode color RGB in floats:
tmp = {}
for c,rgb in colorToRGB.iteritems():
  tmp[c] = [v/255.0 for v in rgb]
colorToRGB = tmp

# Colors in the desired listing order:
colors = ['Red', 'Green', 'Blue',
          'Orange', 'Indigo',
          'Cyan', 'Yellow', 'Magenta',
          'Turquoise', 'Tomato', 'Olive',
          'Violet', 'Green yellow', 'Khaki',
          'Scarlet', 'Beige', 'Chocolate',
          'Silver grey', 'Pink', 'Wheat',
          'Sea green', 'Greyscale', 'Light wood',
          'Sky Blye', 'Brown', 'Salmon', 'Navy Blue',
          'Aquamarine', 'Purple', 'Dark wood']

# Initalize table of colors vs stacks to use:
table = {}
for k,v in zip(colors, [1] + [0 for i in range(len(colors)-1)]):
  table[k] = v


def asImg(color, section):
  global bfvs, table
  index = table[color]
  if 0 == index:
    return 0  # is "None" color
  return IJF.wrap(ImagePlus("", bfvs[index-1].getProcessor(section)))

def maybeNormalize(fn):
  """ Do not normalize if no images are present. """
  if 0 == fn:
    return fn
  cursors = []
  fn.findCursors(cursors)
  if len(cursors) > 0:
    return Multiply(Normalize(fn), 255)
  return fn

def blendColors(section):
  global bfvs, table, colorToRGB
  red =  0
  green = 0
  blue = 0
  for colorName,index in table.iteritems():
    if 0 == index: continue
    img = IJF.wrap(ImagePlus("", bfvs[index-1].getProcessor(section)))
    rgb = colorToRGB[colorName]
    if 0 != rgb[0]:
      red = Max(red, Multiply(img, rgb[0]))
    if 0 != rgb[1]:
      green = Max(green, Multiply(img, rgb[1]))
    if 0 != rgb[2]:
      blue = Max(blue, Multiply(img, rgb[2]))
  return red, green, blue

class VS(VirtualStack):
  def __init__(self):
    self.last = None
  def getProcessor(self, i):
    """ Channel color composition into a single RGB image, as ColorProcessor. 'i' is the section index, 1<=i<=size """
    red, green, blue = blendColors(i)
    # Transform to RGB by normalizing and scaling to 255
    red = maybeNormalize(red)
    green = maybeNormalize(green)
    blue = maybeNormalize(blue)
    # Compose
    rgb = RGBA(red, green, blue).asImage()
    self.last = IJF.displayAsVirtualStack(rgb).getProcessor()
    return self.last
  def getSize(self):
    return bfvs[0].getSize()
  def getSliceLabel(self, i):
    return str(i)
  def getWidth(self):
    return self.last.getWidth()
  def getHeight(self):
    return self.last.getHeight()
  def getPixels(self, i):
    return self.getProcessor(i).getPixels()
  def setPixels(self, pix, i):
    pass


# Create a new image stack
print os.path.split(srcDir)
ourImp = ImagePlus(os.path.split(srcDir)[1], VS())
ourImp.show()

# Create a bunch of panels, one for each color channel
all = JPanel()
layout = GridLayout(len(colors), 2)
all.setLayout(layout)

# GUI to choose which stacks is shown in which channel
class Listener(ActionListener):
  def __init__(self, color, choice, imp):
    self.color = color
    self.choice = choice
    self.imp = imp
  def actionPerformed(self, event):
    global table
    table[self.color] = self.choice.getSelectedIndex()
    self.imp.updateAndRepaintWindow()

for color in colors:
  all.add(JLabel(color))
  choice = JComboBox(names)
  choice.setSelectedIndex(table[color])
  choice.addActionListener(Listener(color, choice, ourImp))
  all.add(choice)

frame = JFrame("Channels")
frame.getContentPane().add(JScrollPane(all))
frame.pack()

frame.setVisible(True)
根据彼此之间的距离将 PointRoi 的所有点排序成链
可能有更好的方法,但这里是一种。阅读标题以了解其局限性。
# Albert Cardona 2010-12-17 for Victoria Butler at HHMI Janelia Farm
# Given a PointRoi, order the points in a chain
# Assumes that the point furthest from all points
# is the start or the end of the chain.

from javax.vecmath import Point2f

# Obtain the PointRoi of the current image
proi = IJ.getImage().getRoi()

# Interrupt if the ROI is not a PointRoi instance:
if proi.getClass() != PointRoi:
  raise Exception("Not a PointRoi!")

class Point(Comparable):
  def __init__(self, x, y):
    self.p = Point2f(x, y)
    self.distances = {}
    self.distAll = None
  def distance(self, point):
    return self.p.distance(point.p)
  def distanceToAll(self):
    if self.distAll is None:
      self.distAll = reduce(lambda a, b: a + b, self.distances.values())
    return self.distAll
  def compareTo(self, point):
    if self.distanceToAll() < point.distanceToAll():
      return -1
    return 1
  def toString(self):
    return self.p.toString()
  def closest(self, points):
    """ Find the closest point that is not contained in the set of given points. """
    next = None
    dist = Float.MAX_VALUE
    for p,d in self.distances.iteritems():
      if d < dist and not p in points:
        next = p
        dist = d
    return next

# Convert PointRoi points to Point instances
px = proi.getXCoordinates()
py = proi.getYCoordinates()
bounds = proi.getBounds()
points = []
for i in range(proi.getNCoordinates()):
  points.append(Point(bounds.x + px[i], bounds.y + py[i]))

# Precompute all-to-all distances
allToAll = {}
for j in range(len(points)):
  for k in range(j+1, len(points)):
    distance = points[j].distance(points[k])
    points[j].distances[points[k]] = distance
    points[k].distances[points[j]] = distance

# Choose a starting point.
# In this case, we use the point most distant from all other points
points.sort()
first = points[-1]
print "First:", first

# Grow the chain from the starting point
chain = [first]
seen = set() # for fast look-up
seen.add(chain[0])
while len(chain) < len(points):
  next = chain[-1].closest(seen)
  if next is None:
    break
  chain.append(next)
  seen.add(next)

print "Chain:", chain
堆栈中的正确照明:将一个切片的照明应用于所有其他切片
多焦点 3D 显微镜(Sara Abrahamsson 和 Matz Gustafsson)拍摄单个图像,然后通过计算提取 9 个图像平面。
中间的切片通常具有所需的照明级别,而其他 8 个切片(前 4 个,后 4 个)则没有。这是一个将第五个切片的照明应用于所有其他切片的脚本。
该脚本获取图像目录并对它们进行全部处理,从而在同一目录中以“*- Corrected.tif”形式存储新图像。
# Albert Cardona 2011-06-09 at HHMI Janelia Farm
# Takes a stack of 9 slices
# and then computes the mean and stdDev of slice number 5
# and normalize the intensity of the other 8 slices
# to that of slice 5.
#
# Created for Jiji Chen to process image stacks from
# the multifocus 3D microscope from Matz Gustafsson
# and Sara Abrahamsson


from math import sqrt
import os

def computeMean(pixels):
  return sum(pixels) / float(len(pixels))

def computeStdDev(pixels, mean):
  s = 0
  for i in range(len(pixels)):
    s += pow(pixels[i] - mean, 2)
  return sqrt(s / float(len(pixels) -1))

def process9ImagePlanes(imp):
  # reference slice
  refSlice = 5
  ref = imp.getStack().getProcessor(5)
  refMean = sum(ref.getPixels()) / float(len(ref.getPixels()))
  refStdDev = computeStdDev(ref.getPixels(), refMean)

  # New stack with the corrected slices
  stack = ImageStack(ref.width, ref.height)

  for i in range(1, 10):
    # skip the reference slice
    if 5 == i:
      stack.addSlice(imp.getStack().getSliceLabel(5), ref.convertToFloat())
      continue
    ip = imp.getStack().getProcessor(i).convertToFloat()
    mean = computeMean(ip.getPixels())
    stdDev = computeStdDev(ip.getPixels(), mean)
    ip.add(-mean)
    ip.multiply(1/stdDev)
    ip.multiply(refStdDev)
    ip.add(refMean)
    stack.addSlice(imp.getStack().getSliceLabel(i), ip)

  return ImagePlus(imp.title, stack)


def accept(filename):
  """ Work only with TIFF files. """
  return len(filename) - 4 == filename.rfind(".tif")

def run():
  dc = DirectoryChooser("pick folder with image stacks")
  folder = dc.getDirectory()
  if folder is None:
    return
  for filename in filter(accept, os.listdir(folder)):
    imp = IJ.openImage(os.path.join(folder, filename))
    if imp is None:
      print "Failed to open image:", filename
      continue
    corrected = process9ImagePlanes(imp)
    IJ.save(corrected, os.path.join(folder, filename[0:-4] + "-corrected.tif"))

run()
将鼠标侦听器添加到每个打开图像的画布上
from java.awt.event import MouseAdapter

def doSomething(imp):
 """ A function to react to a mouse click on an image canvas. """
 IJ.log("clicked on: " + str(imp))

class ML(MouseAdapter):
 def mousePressed(self, event):
   canvas = event.getSource()
   imp = canvas.getImage()
   doSomething(imp)

listener = ML()

for imp in map(WindowManager.getImage, WindowManager.getIDList()):
 win = imp.getWindow()
 if win is None:
   continue
 win.getCanvas().addMouseListener(listener)
运行脚本后,单击任何图像都会在日志窗口中打印一行,例如:
clicked on: imp[Untitled-1 400x200x1]
将一个关键侦听器添加到每个打开图像的画布上
from ij import IJ, WindowManager
from java.awt.event import KeyEvent, KeyAdapter

def doSomething(imp, keyEvent):
  """ A function to react to key being pressed on an image canvas. """
  IJ.log("clicked keyCode " + str(keyEvent.getKeyCode()) + " on image " + str(imp))
  # Prevent further propagation of the key event:
  keyEvent.consume()

class ListenToKey(KeyAdapter):
  def keyPressed(this, event):
    imp = event.getSource().getImage()
    doSomething(imp, event)

listener = ListenToKey()

for imp in map(WindowManager.getImage, WindowManager.getIDList()):
  win = imp.getWindow()
  if win is None:
    continue
  canvas = win.getCanvas()
  # Remove existing key listeners
  kls = canvas.getKeyListeners()
  map(canvas.removeKeyListener, kls)
  # Add our key listener
  canvas.addKeyListener(listener)
  # Optionally re-add existing key listeners
  # map(canvas.addKeyListener, kls)
从文件夹及其子文件夹中存在的 TIF 文件递归创建虚拟堆栈
# Walk recursively through an user-selected directory
# and add all found filenames that end with ".tif"
# to a VirtualStack, which is then shown.
#
# It is assumed that all images are of the same type
# and have the same dimensions.

import os
from ij.io import DirectoryChooser
from ij import IJ, ImagePlus, VirtualStack

def run():
  srcDir = DirectoryChooser("Choose!").getDirectory()
  if not srcDir:
    # user canceled dialog
    return
  # Assumes all files have the same size
  vs = None
  for root, directories, filenames in os.walk(srcDir):
    for filename in filenames:
      # Skip non-TIFF files
      if not filename.endswith(".tif"):
        continue
      path = os.path.join(root, filename)
      # Upon finding the first image, initialize the VirtualStack
      if vs is None:
        imp = IJ.openImage(path)
        vs = VirtualStack(imp.width, imp.height, None, srcDir)
      # Add a slice, relative to the srcDir
      vs.addSlice(path[len(srcDir):])
  #
  ImagePlus("Stack from subdirectories", vs).show()

run()
将一个非常大的多图像堆栈文件的切片逐个打开,并将每个保存为新的图像文件
# 2011-10-18 Albert Cardona for Nuno da Costa
# Choose a multi-slice image stack file in a virtual way
# and save each slice as an individual image file
# in a user-chosen directory.

import os
from loci.plugins.util import BFVirtualStack
from loci.formats import ChannelSeparator

def run():
  # Choose a file to open
  od = OpenDialog("Choose multi-image file", None)
  srcDir = od.getDirectory()
  if srcDir is None:
    # User canceled the dialog
    return
  path = os.path.join(srcDir, od.getFileName())
  # Choose a directory to store each slice as a file
  targetDir = DirectoryChooser("Choose target directory").getDirectory()
  if targetDir is None:
    # User canceled the dialog
    return
  # Ready:
  cs = ChannelSeparator()
  cs.setId(path)
  bf = BFVirtualStack(path, cs, False, False, False)
  for sliceIndex in xrange(1, bf.getSize() +1):
    print "Processing slice", sliceIndex
    ip = bf.getProcessor(sliceIndex)
    sliceFileName = os.path.join(targetDir, str(sliceIndex) + ".tif")
    FileSaver(ImagePlus(str(sliceIndex), ip)).saveAsTiff(sliceFileName)

run()
对图像堆栈中的每个切片应用二进制掩码
将适用于常规堆栈和任何类型的复杂堆栈,例如合成图像或 4d 体积。请记住,ImageJ 中的所有堆栈类型都由一系列 2d 图像组成,每个图像都可以使用从 ImageStack 获得的 ImageProcessor 进行编辑,也可以从 ImagePlus 获得。 (ImagePlus是开场白或WindowManager提供的内容。)
# Albert Cardona 2012-10-05 for Sara Abrahamsson
#
# Take a stack of images and a mask,
# and clear the area outside the mask for every image.
#
# ASSUMES that the mask:
# 1. Is 8-bit;
# 2. has the area to keep as 255;
# 3. has the area to clear as zeros.


from ij import IJ
from ij import WindowManager as WM

# If the images are open:
volume = WM.getImage("stack.tif")
mask = WM.getImage("mask.tif")

# Or if the images have to be loaded from files:
# volume = IJ.openImage("/Users/sara/images/stack.tif")
# mask = IJ.open("/Users/sara/images/mask.tif")

# Obtain the underlying stack of 2d images
stack = volume.getStack()

# Fill every stack slice with zeros for the area outside the mask
for i in xrange(1, stack.getSize() + 1):
  # ip is the ImageProcessor for one stack slice
  ip = stack.getProcessor(i)
  ip.setValue(0)
  ip.fill(mask)

volume.updateAndDraw()
volume.show()
请注意,掩模外部的区域被零填充是违反直觉的。如果您希望蒙版内的区域填充零,请在循环之前添加此步骤:
mask = mask.duplicate()
mask.invert()
使用 Bio-Formats 打开 LIF 文件中的所有系列
# 2014-11-24 Harri Jäälinoja

from loci.plugins.in import ImagePlusReader,ImporterOptions,ImportProcess
import sys

filename = sys.argv[1]
opts = ImporterOptions()
opts.setId(filename)
opts.setUngroupFiles(True)

# set up import process
process = ImportProcess(opts)
process.execute()
nseries = process.getSeriesCount()

# reader belonging to the import process
reader = process.getReader()

# reader external to the import process
impReader = ImagePlusReader(process)
for i in range(0, nseries):
    print "%d/%d %s" % (i+1, nseries, process.getSeriesLabel(i))

    # activate series (same as checkbox in GUI)
    opts.setSeriesOn(i,True)

    # point import process reader to this series
    reader.setSeries(i)

    # read and process all images in series
    imps = impReader.openImagePlus()
    for imp in imps:
        imp.show()
        wait = Wait(str(i) + imp.getTitle())
        wait.show()
        imp.close()

    # deactivate series (otherwise next iteration will have +1 active series)
    opts.setSeriesOn(i, False)
使用 FFMPEG I/O 插件打开和保存电影
首先请注意,FFMPEG I/O 插件是一个完全未维护的概念验证。
然后打开Fiji Updater,按下对话框左下角的“管理更新站点”,并通过Johannes Schindelin勾选其复选框来安装FFMPEG插件,如explained in more detail here。
另请参阅 FFMPEG plugin source code site 中的 IO 类的 Java 源代码。
""" Albert Cardona for Marta Zlatic, 2014-01-24. """

from fiji.ffmpeg import IO
from java.awt import Color
import os

def load(path, first_frame=0, last_frame=-1):
  """ Load the whole movie by default. """
  io = IO()
  imp = io.readMovie(path, False, first_frame, last_frame)
  return imp

def save(path, imp, frame_rate=30, bit_rate=400000):
  """ frame_rate in fps (frames per second).
      bit_rate defines the quality of the movie: higher bit rate results in larger, higher quality movies.
      The movie format (e.g. AVI, MPG, etc.) is chosen by the path filename extension. """
  io = IO()
  io.writeMovie(imp, path, frame_rate, bit_rate)


def process(imp, convert, roi, time_zero, time_range):
  """ Crop, convert to another format, and time-stamp. """
  stack = imp.getStack()
  size = stack.getSize()
  bounds = roi.getBounds()
  new_stack = ImageStack(bounds.width, bounds.height)
  for i in xrange(1, size + 1):
    ip = convert(stack.getProcessor(i))
    ip.setRoi(roi)
    c = ip.crop()
    c.setColor(Color.white)
    time = "%.2f" % (time_zero + time_range * (float(i-1) / (size -1)))
    c.drawString(time, 5, 15)
    new_stack.addSlice(str(i), c)

  return ImagePlus(imp.title, new_stack)


def batch_process(extension, source_dir, output_dir, convert, roi, time_zero, time_range):
  for filename in os.listdir(source_dir):
    if filename.endswith(extension):
      if os.path.exists(target_dir + filename):
        # Skip if movie exists at destination
        continue
      imp = load(source_dir + filename)
      imp2 = process(imp, convert, roi, time_zero, time_range)
      imp.flush()
      save(target_dir + filename, imp2)
      imp2.flush()


def convert(ip):
  """ Convert to 8=bit and crop the range to [0, 128] pixel values. """
  c = ip.convertToByte(True)
  c.setMinAndMax(0, 128)
  return c


source_dir = '/path/to/list_of_AVI_movies/'
target_dir = '/path/to/new_list_of_AVI_movies/'

roi = Roi(50, 50, 256, 256)
time_zero = 30   # start at 30 seconds
time_range = 30  # range of (also) 30 seconds

# Process all AVI movie files, saving them also as AVI files
batch_process('.avi', source_dir, target_dir, convert, roi, time_zero, time_range)
骨架化图像并分析骨架
from ij import IJ
from skeleton_analysis import AnalyzeSkeleton_,Graph,Edge,Vertex

# open image, blur, make b/w, skeletonize
imp = IJ.openImage("/path/to/image.tif")
IJ.run(imp,"Gaussian Blur...","sigma=5")
IJ.run(imp,"Make Binary","")
IJ.run(imp,"Skeletonize","")

# run AnalyzeSkeleton
# (see https://fiji.sc/AnalyzeSkeleton
# and https://fiji.sc/javadoc/skeleton_analysis/package-summary.html)
skel = AnalyzeSkeleton_()
skel.setup("",imp)
skelResult = skel.run(skel.NONE, False, True, None, True, True)

# get the separate skeletons
graph = skelResult.getGraph()
print len(graph)
print skelResult.getNumOfTrees()

def getGraphLength(graph):
    length = 0
    for g in graph.getEdges():
    length = length + g.getLength()
    return length

# find the longest graph
graph = sorted(graph, key=lambda g: getGraphLength(g), reverse=True)
longestGraph = graph[0]

# find the longest edge
edges = longestGraph.getEdges()
edges = sorted(edges, key=lambda edge: edge.getLength(), reverse=True)
longestEdge = edges[0]
查找 3D 图像中的峰值
# @ImagePlus imp

from fiji.plugin.trackmate.detection import DogDetector
from ij.gui import PointRoi
from ij.plugin.frame import RoiManager
from net.imglib2.img.display.imagej import ImageJFunctions

# Set the parameters for DogDetector
img = ImageJFunctions.wrap(imp)
interval = img
cal = imp.getCalibration()
calibration = [cal.pixelWidth, cal.pixelHeight, cal.pixelDepth]
radius = 0.2 # the radius is half the diameter
threshold = 100
doSubpixel = True
doMedian = False

# Setup spot detector
# (see http://javadoc.imagej.net/Fiji/fiji/plugin/trackmate/detection/DogDetector.html)
#
# public DogDetector(RandomAccessible<T> img,
#            Interval interval,
#            double[] calibration,
#            double radius,
#            double threshold,
#            boolean doSubPixelLocalization,
#            boolean doMedianFilter)
detector = DogDetector(img, interval, calibration, radius, threshold, doSubpixel, doMedian)

# Start processing and display the results
if detector.process():
    # Get the list of peaks found
    peaks = detector.getResult()
    print str(len(peaks)), "peaks were found."

    # Add points to ROI manager
    rm = RoiManager.getInstance()
    if not rm:
        rm = RoiManager()

    # Loop through all the peak that were found
    for peak in peaks:
        # Print the current coordinates
        print peak.getDoublePosition(0), peak.getDoublePosition(1), peak.getDoublePosition(2)
        # Add the current peak to the Roi manager
        proi = PointRoi(peak.getDoublePosition(0) / cal.pixelWidth, peak.getDoublePosition(1) / cal.pixelHeight)
        proi.setPosition(int(peak.getDoublePosition(2) / cal.pixelDepth))
        rm.addRoi(proi)

    # Show all ROIs on the image
    rm.runCommand(imp, "Show All")

else:
    print "The detector could not process the data."
提示和技巧
获取一个包中所有成员的列表
您可以使用 Python 函数 *dir(
import ij
print dir(ij)

As of April 26nd, 2010, you need to start Fiji with:
fiji -Dpython.cachedir.skip=false --
for dir(<package>) to work.
指定源的编码
当您的源代码包含非 ASCII 字符(例如元音变音)时,Jython 将发出 *SyntaxError: Non-ASCII character in file ‘
您可以通过放置以下行来解决此问题
# -*- coding: iso-8859-15 -*-

as first line into your source code (or if it starts with *\#!/usr/bin/python*, as second line), as suggested [here](http://docs.python.org/tutorial/interpreter.html#source-code-encoding). You might need to replace the string *iso-8859-15* by something like *utf-8* if your source code is encoded in UTF-8.

### Changing the default encoding

By default, Jython encodes the standard output (and other streams) with the ASCII encoding. Often, this is not what you want. You can change the default encoding like this:

    from org.python.core import codecs
    codecs.setDefaultEncoding('utf-8')

### Error handling with try / except / finally

See complete documentation at: [jython book chapter 6](http://jythonpodcast.hostjava.net/jythonbook/chapter6.html).

    x = 10
    y = 0

    try:
         z = x / y
    except NameError, e1:
         print "A variable is not defined!", e1
    except ZeroDivisionError, e2:
         print "Dividing by zero doesn't make any sense! Error:", e2
    finally:
         print "This line will always print no matter what error occurs."

Which prints:
除以零没有任何意义!错误:整数除或以零为模 无论发生什么错误,都会打印这一行
要捕获任何类型的错误,请使用 sys.exc_info:
import sys

try:
  z = x / z
except:
  print "Error: ", sys.exc_info()
哪个打印:
Error: (<type 'exceptions.NameError'>, NameError("name 'x' is not defined",), <traceback object at 0x2>)
为了确保您看到堆栈跟踪,请将其打印到 ImageJ 日志窗口而不是 stdout(无论后者是什么):
IJ.log(str(sys.exc_info()))
导入其他 .py 脚本(模块)
如果你想导入其他Python文件,你需要“导入”它们。这要求在所谓的“搜索路径”中找到这些文件,Jython 在其中查找要导入的模块(.py 文件)的目录列表。您可以轻松扩展搜索路径:
from sys import path
from java.lang.System import getProperty

# extend the search path by $FIJI_ROOT/bin/
path.append(getProperty('fiji.dir') + '/bin')

# Now you can import $FIJI_ROOT/bin/compat.py
import compat
您可能会遇到的情况是当 fiji plugins 文件夹下的文件夹中有多个 jython 脚本时。
例如,假设 fiji plugins 文件夹下有 my scripts 文件夹,其中有脚本 Filters.py ,其中包含以下过滤器函数:
# Script plugins/my scripts/Filters.py
from ij import IJ
from ij.plugin import Duplicator

def median(imp, radius):
  """ Apply a median filter to a copy
	  of the given ImagePlus, and return it. """
  copy = Duplicator().run(imp)
  IJ.run(copy, "Median...", "radius=" + str(radius))
  return copy

def removeOutliers(imp, radius, threshold, bright):
  """ Apply a remove outliers filter to a copy
	  of the given ImagePlus, and return it. """
  copy = Duplicator().run(imp)
  which = "Bright" if bright else "Dark"
  IJ.run(copy, "Remove Outliers...", "radius=" + str(radius) \
	  + " threshold=" + str(threshold) + " which=" + which)
  return copy
现在您有第二个脚本,您想在其中使用 Filters.py 脚本中的函数:
from ij import IJ
import sys
from java.lang.System import getProperty
sys.path.append(getProperty("fiji.dir") + "/plugins/my scripts")
from Filters import median

imp = IJ.getImage()
medianFiltered = median(imp, 5.0)
medianFiltered.show()
定义一个类并创建新类的实例
一个存储 X、Y 坐标的简单类。 (在实际代码中,只需使用 javax.vecmath.* 类,如 Point3f、Point3d 等)
构造函数用 __init__ 定义,并接受至少一个参数 ,按照惯例命名为 self(您可以将其命名为其他名称,例如 this)。
from math import sqrt, pow

class Point:
  def __init__(self, x, y):
	self.x = x
	self.y = y
  def distance(self, other):
	return sqrt(pow(self.x - other.x, 2), pow(self.y - other.y, 2))
…并创建两个实例,并测量它们之间的距离。为了创建新实例,我们使用类的名称和括号中的参数:
p1 = Point(10, 20)
p2 = Point(40, 55.3)

print "Distance:", p1.distance(p2)
向类添加静态方法
静态方法是不需要 self 第一个参数的类方法。您可以单独使用类的名称来调用此方法 - 不需要在实例上调用它。
要将方法声明为静态,请使用 @staticmethod 对其进行修饰,如下所示的方法 two:
班级编号:
  def one(self):
    return 1

  @staticmethod
  def two():
    return 2
现在,要调用这些方法,请注意如何不需要在实例上调用 two(我们只需在前面加上类名),但 one 却需要:
print Numbers.two()

that = Numbers()
print that.one()
为什么要使用静态方法?保持命名空间整洁很有用,可以避免名称冲突。
创建多维原生 java 数组
假设你想创建一个一维双精度数组,相当于java中的double[]。这就是你要做的:
from jarray import array

data = [1.0, 2.0, 3.0, 4.0]

arr = array(data, 'd')
其他可接受的原始数组类型有:
z  boolean
c  char
b  byte
h  short
i  int
l  long
f  float
d  double
但现在假设您想要一个二维双精度数组,相当于 java 中的double[][]。怎么做呢?方法如下:
from jarray    import array
from java.lang import Class

data = [[1.0, 2.0], [3.0, 4.0]]
twoDimArr = array(data, Class.forName('[D'))
本质上,我们所做的就是为函数 array 提供参数 一维双精度数组的类,以便它将创建一个该数组 - 因此是一个二维双精度数组。
对于 jython 中的三维数组,您只需在类名中添加另一个 [(方括号):
from jarray import array
from java.lang import Class

data = [[[1, 2, 3], [4, 5, 6]], [[1, 2, 3], [4, 5, 6]]]
threeDimArr = array(data, Class.forName('[[D'))
要创建任何类的原始数组,请传递类本身。例如,String 的本机数组:
from jarray import array

texts = ["one", "two", "three"]

strings = array(texts, String)
当然数组也可以创建为空。对于数字,所有值都为零。对于任意类,例如 String,所有值都将为 null(或 None,用 Python 术语来说)。
在下面的示例中,我们创建一个 double[N][] 类型的空二维数组,其中较小的内部数组为 null(就像在 java 中 new double[5][] 的二阶数组也全部为 null):
from jarray import zeros

twoDimArr = zeros(5, Class.forName("[D"))

print twoDimArr
# prints: array([D, [None, None, None, None, None])

# fill each slot with a new array of length 3:
for i in range(len(twoDimArr)):
  twoDimArr[i] = zeros(3, 'd')

print twoDimArr
#prints: array([D, [array('d', [0.0, 0.0, 0.0]), array('d', [0.0, 0.0, 0.0]),
# array('d', [0.0, 0.0, 0.0]), array('d', [0.0, 0.0, 0.0]), array('d', [0.0, 0.0, 0.0])])
jython 中的内联 java 代码:Weaver
Jython 非常擅长对图像进行高级操作。但有时人们想要专门编辑像素。 jython 中低级循环的性能与 java 提供的性能相差甚远。但是,为一小段代码编写一个特殊用途的 Java 类是很痛苦的,并且需要有关代码编译和类路径管理的特定 Java 技能。
织工消除了所有的痛苦。
Weaver 提供了两种嵌入 java 代码的方法:inline 和 method。
以下是使用 inline 方法的示例,其中迭代当前图像的 float[] 像素数组来计算平均强度:
from fiji.scripting import Weaver
from ij import IJ
from java.lang import Double

# The currently open image
imp = IJ.getImage()

fp = imp.getProcessor().convertToFloat()
pixels = fp.getPixels()  # a float array, float[]
三个参数:
1.要嵌入的java代码。
2. 绑定字典,其中键是在 java 代码中使用的名称,值是要绑定到它的对象。
3. 返回类型(可选;默认为 java.lang.Object)。
w = Weaver.inline(
    """
    double sum = 0;
    for (int i=0; i<pixels.length; i++) {
        sum += pixels[i];
    }
    return sum / pixels.length;
    """,
    {"pixels" : pixels}, Double)

mean = w.call()

print mean
上面的内容很简单,仅作为示例(有更好的方法来获取平均值,例如通过 imp.getStatistics()。请注意,Weaver.inline 函数采用三个参数:内联的 java 代码、绑定映射和返回类型。在示例中,我们仅传递 float[] 像素数组,并将 Double 定义为返回类型。返回类型是可选的。
在内部,绑定表示为 java 类中的字段,设置为基元(如 double、int …)或要绑定的对象的最不通用的公共类或超类。
利用 Weaver.inline 功能的一个更好的示例如下:编译函数一次,然后使用不同的参数反复调用它。绑定无法更改,但如果它们是数组或集合,则可以更改这些集合的元素。例如,要获得新的 ImageStack,它是对每对连续的切片应用 XOR 的结果(这将为您提供对象的边界):
from ij import IJ, ImagePlus, ImageStack
from fiji.scripting import Weaver

# The currently open image, an 8-bit stack
imp = IJ.openImage("https://imagej.net/ij/images/bat-cochlea-volume.zip")

slices = [None, None]

w = Weaver.inline(
    """
    byte[] pix1 = (byte[]) slices.get(0);
    byte[] pix2 = (byte[]) slices.get(1);

    byte[] xor = new byte[pix1.length];
    for (int i=0; i<pix1.length; i++) {
        xor[i] = (byte)(pix1[i] ^ pix2[i]);
    }
    return xor;
    """,
    {"slices" : slices})

stack = imp.getStack()
stackXOR = ImageStack(stack.width, stack.height)

for i in range(2, imp.getNSlices()+1):
  # Put the pixel arrays into the pre-made list
  slices[0] = stack.getPixels(i-1)
  slices[1] = stack.getPixels(i)
  # Invoke native code
  stackXOR.addSlice( str(i-1), w.call() )

ImagePlus("XORed stack", stackXOR).show()
上述 Weaver.inline 方法变得有点冗长和临时性,必须编辑 slices 列表的内容。
相反,这里是相同的代码,但使用 Weaver.method 方法,其中,我们不使用绑定,而是直接将数组作为方法参数传递。这种方法需要更多地了解 java,但不需要太多,才能声明完整的 java 类方法(或任意数量的方法)。返回的 w 对象包含该方法,我们可以用两个字节数组作为参数来调用该方法:
from ij import IJ, ImagePlus, ImageStack
from fiji.scripting import Weaver

# The currently open image, an 8-bit stack
imp = IJ.openImage("https://imagej.net/ij/images/bat-cochlea-volume.zip")

w = Weaver.method(
  """
  public byte[] xor(byte[] pix1, byte[] pix2) {
    byte[] xor = new byte[pix1.length];
    for (int i=0; i<pix1.length; i++) {
        xor[i] = (byte)(pix1[i] ^ pix2[i]);
    }
    return xor;
  }
  """)

stack = imp.getStack()
stackXOR = ImageStack(stack.width, stack.height)

for i in range(2, imp.getNSlices()+1):
  # Invoke native code
  stackXOR.addSlice( str(i-1), w.xor(stack.getPixels(i-1), stack.getPixels(i)) )

ImagePlus("XORed stack", stackXOR).show()
Weaver.inline 和 Weaver.method 有两个附加的可选参数:
- 作为导入插入的类列表,以便代替完全限定的类名
ij.process.FloatProcessor ip = new ij.process.FloatProcessor(100, 100)…可以写得更简短:
FloatProcessor ip = new FloatProcessor(100, 100) - 一个布尔值,用于在脚本编辑器的选项卡中显示生成的 java 代码。
这是一个使用 Weaver.method 的小例子,它使用了导入。该脚本从每个像素中减去“10”:
from net.imglib2.type.numeric.real import FloatType
from net.imglib2.img.display.imagej import ImageJFunctions as IJF
from fiji.scripting import Weaver
from ij import IJ
from net.imglib2 import Cursor, IterableInterval
from net.imglib2.type.numeric.real import FloatType

# Grab a 32-bit image
imp = IJ.getImage()

# View it as an ImgLib2 image
img = IJF.wrap(imp)

# Declare a java method to subtract a value from every pixel
w = Weaver.method(
  """
  public void subtract(final IterableInterval<FloatType> img, final float value) {
    final FloatType v = new FloatType(-value);
    final Cursor<FloatType> cursor = img.cursor();
    while (cursor.hasNext()) {
      cursor.fwd();
      cursor.get().add(v);
    }
  }
  """,
  [IterableInterval, Cursor, FloatType])

w.subtract(img, 10)

imp.updateAndDraw()
当然,Weaver 是一个 java 库,可以从任何脚本语言(例如 Javascript、JRuby 和 others)中使用。
以上所有内容均受到 Scientific Python Weaver, or scipy Weaver 的启发,它将 C 代码内联到 python 文件中。
读取给予脚本的命令行参数
Fiji 启动器可以执行脚本。使用启动器从命令行运行脚本时,可以方便地读出提供给脚本的参数。例如,假设您创建一个脚本来打开图像文件并对其进行一些处理,并且您想要从命令行参数读取要打开的文件的名称。具体方法如下:
import os, sys
from ij import IJ

# Expecting one argument: the file path
if len(sys.argv) < 2:
  print "Usage: ./fiji-linux64 <script-name> <file-path>"
  sys.exit(1)

filepath = sys.argv[1]

# Check if the file exists
if not os.path.exists(filepath):
  print "File does not exist at path:", filepath
  sys.exit(1)

# Open the image
imp = IJ.openImage(filepath)
print "Processing:", imp.title

# Do some processing ...
重要提示:请注意,从命令行执行脚本时,不会自动导入常见导入。因此,上面我们必须声明“from ij import IJ”来导入命名空间IJ以及所有静态实用函数,例如openImage。
从正在运行的宏中捕获错误
即使失败,ImageJ 也会以零退出(参见bug report)。一种可能的解决方法是将宏转换为插件,但更快的解决方法是将宏调用包装到脚本中。为此,检查返回的 runMacroCode 字符串就足够了,如果是 failure,则返回字符串 [aborted]:
from ij import IJ
import sys

if not len (sys.argv) > 1:
  raise TypeError ("No macro file argument")

status = IJ.runMacroFile(sys.argv[1])
if status == '[aborted]':
  raise StandardError ("Macro execution failed")

sys.exit (0)
当然,如果你的宏碰巧返回 [aborted] 表示成功,那么你就不走运了;)
运行第 3 方 java 库
可以在 Jython 中运行外部 java 程序。要使它们可用,只需将相应的 jar 文件复制到 Fiji 的插件文件夹中即可。要导入各自的java类,只需执行以下操作
import name.of.external.java.library as foo
如果外部包的类名未知,一种可能是手动检查 jar 文件。在 Linux 和 Mac OS 系统上只需在命令行上执行
jar tvf <library>.jar
这将以纯文本形式打印 jar 内容,查找以“.class”结尾的条目。对于 jython 中 json 的实现(由 jyson.xhaus.com 提供),输出如下所示:
jar tvf jyson-1.0.2.jar
     0 Sat Mar 17 14:06:40 CET 2012 META-INF/
   106 Sat Mar 17 14:06:38 CET 2012 META-INF/MANIFEST.MF
     0 Sat Mar 17 14:06:40 CET 2012 com/
     0 Sat Mar 17 14:06:40 CET 2012 com/xhaus/
     0 Sat Mar 17 14:06:40 CET 2012 com/xhaus/jyson/
   174 Sat Mar 17 14:06:40 CET 2012 com/xhaus/jyson/JSONDecodeError.class
   174 Sat Mar 17 14:06:40 CET 2012 com/xhaus/jyson/JSONEncodeError.class
   162 Sat Mar 17 14:06:40 CET 2012 com/xhaus/jyson/JSONError.class
  1650 Sat Mar 17 14:06:40 CET 2012 com/xhaus/jyson/JysonCodec.class
  6350 Sat Mar 17 14:06:40 CET 2012 com/xhaus/jyson/JysonDecoder.class
  3899 Sat Mar 17 14:06:40 CET 2012 com/xhaus/jyson/JysonEncoder.class
JysonCodec.class 是顶级类,因此要导入此库,请在 jython 脚本中包含以下行:
import com.xhaus.jyson.JysonCodec as jyson
用于插件的 Jython
使用 jython 脚本作为插件
最简单的方法是将 jython 脚本文件放入 fiji/plugins/ 文件夹或子文件夹中,运行 Plugins › Scripting › Refresh Jython Scripts 或 Help › Refresh Menus 或重新启动 Fiji 后,它将出现在菜单中。
如果您想让 Jython 脚本显示在“插件”菜单之外的位置,只需将该文件放入 fiji/plugins/Scripts/ 的适当子目录中即可;例如,如果您将名为 Animation_.py 的 Jython 脚本放入 fiji/plugins/Scripts/File/New/,则它将作为 File › New › Animation 提供。
为了填充更新站点,更新程序可以直接将 jython 脚本上传为 .py(对于驻留在 Jars/Lib 文件夹中的脚本,则为 $py.class)。或者,如果您想捆绑多个脚本,您可以将它们打包到 jar 存档中,如下所述。
在 .jar 文件中分发 jython 脚本
请注意:无需执行以下操作 - 除非您想将几个脚本捆绑在一个包中。请参阅上面的条目。
整个想法是能够在单个 .jar 文件中分发整个脚本集合,以提供最大的便利。
在此示例中,我们创建两个 jython 脚本,希望将其作为插件在 .jar 文件中分发:
printer.py脚本:
IJ.log("Print this to the log window")
…以及 create_new_image.py 脚本:
ip = ByteProcessor(400, 400)
imp = ImagePlus("New", ip)
ip.setRoi(OvalRoi(100, 100, 200, 200))
ip.setValue(255)
ip.fill(ip.getMask())
imp.show()
手工包装
将这两个脚本放在名为 scripts/ 的文件夹下。
您将需要一个微小的 .java 文件来指定启动器插件,例如:
package my;
import ij.plugin.PlugIn;
import Jython.Refresh_Jython_Scripts;

public class Jython_Launcher implements PlugIn {
    public void run(String arg) {
        new Refresh_Jython_Scripts().runScript(getClass().getResourceAsStream(arg));
    }
}
注意,我们将上述文件放在目录my/下,打包。
编译它:
$ javac -classpath .:ij.jar:../jars/fiji-scripting.jar:../plugins/Jython_Interpreter.jar my/Jython_Launcher.java
(检查您需要的三个罐子的路径是否正确!)
然后我们定义plugins.config文件:
Plugins>My Scripts, "Print to log window", my.Jython_Launcher("/scripts/printer.py")
Plugins>My Scripts, "Create image with a white circle", my.Jython_Launcher("/scripts/create_new_image.py")
最后,我们将所有文件放入一个 .jar 文件中:
$ jar cf my_jython_scripts.jar plugins.config my/Jython_Launcher.class scripts/*py
然后,将 jar 文件放入 fiji/plugins/ 文件夹并运行“帮助 - 更新菜单”,或重新启动 fiji。您的脚本将出现在插件 - 我的脚本下。
为了清楚起见,这是文件夹中文件的摘要:
my/Jython_Launcher.javamy/Jython_Launcher.classscripts/printer.pyscripts/create_new_image.pyplugins.config
使用 Maven
即使您不熟悉 Maven,将 py 脚本打包到 jar 中也相当简单。
首先确保您已经安装了 Maven 和 java jdk,并将这两个路径添加到您的环境变量中(参见Maven installation)。
然后下载此Github repository的 zip 文件。并遵循以下指南:
- 将您的脚本放在
Ressources的子文件夹中 - 最终根据您的依赖项修改pom文件(参见Building a POM
- 然后在文件夹中打开命令行并输入
mvn package。
最后,您还可以输入 mvn -Dimagej.app.directory=/path/to/your/Fiji.app -Dimagej.deleteOtherVersions=older 将依赖项自动复制到 ImageJ 安装:方便在全新安装上测试您的包。
注意:尽管正常的打包工作正常,但带有依赖项的后一个命令是 reported not to function with windows Powershell。在这种情况下,请使用不同的命令行工具。
但请注意,您根本不需要进行 .jar 打包。只需将 python 脚本直接放在 fiji/plugins/My Scripts/ 下,它们就会作为常规插件出现在菜单中,并且类似地由更新程序处理以填充更新站点。
斐济的 Jython 示例
- Find Dimension of Raw Image
- Edit LUT As Text
- Delayed Snapshot
- Command Launcher GUI
- List all threads
- TrakEM2 中的Extract stack under AreaList。
- Set all transforms to identity 对于 TrakEM2 对象。
- TrakEM2 中的Select All对象。
- TrakEM2 中的Measure AreaList。
另请参阅
- Albert Cardona 在 Jython scripting with Fiji 中的速成课程。
- Jython 用于 TrakEM2 Scripting。
