See also the step-by-step tutorial on building a macro to automate batch processing.
为什么要使用宏?
宏可用于
- 自动执行重复性任务
- 记录你做了什么
- 共享通用程序
- 添加工具到工具栏
- 添加键盘快捷键

Please be aware that there are several other available scripting languages that are more powerful than macros, too! See the summary of supported languages, as well as the Overcoming limitations section below.
变量
开始宏编程时最重要的概念是变量。变量是变化实体的占位符。它有一个名称和一个值,可以是数字或文本(所谓的字符串)。
当您想要多次执行相同的代码但对于不同的图像、参数等时,就需要变量
变量还可以用于存储通过对话框获得的用户输入。
可以像这样分配变量:
factor = 1024;
在此示例中,factor 是变量的名称,1024 是分配给变量的值。分号告诉 ImageJ 分配已完成。
示例:将文本分配给变量:
message = "Hello, World!";
在本例中,变量被命名为 message,并且文本 Hello, World! 被分配给它;文本在双引号内指定。
使用变量
您可以在表达式中使用变量:您可以使用数值变量进行计算,并且可以连接文本和文本变量。例子:
x = 2;
y = 3;
result = x * x + y + y;
这将为变量 x 分配值 2,为变量 y 分配值 3,然后为变量 result 分配 x 的平方加上 y 的平方。
此示例显示如何concatenate使用变量值来保存固定文本:
name = "Bob";
msg = "Those days are over, " + name;
一个常见的陷阱是在字符串中包含变量的名称。下面的代码演示了这一点:
(BAD 行已被注释掉,以阻止复制它们。如果将此代码粘贴到 script editor 中,则可以取消注释这些行以查看它们的错误)
title = "/scripting/macro";
//write("The name: title");  // BAD - literally prints "title"
write("The name: " + title); // GOOD - properly uses the title variable value
当使用反映传递给 run() 方法的参数的变量时,同样的原则适用,例如
specifiedRadius = 3;
//run("Median...", "radius=specifiedRadius");  // BAD - will literally pass "specifiedRadius"
run("Median...", "radius=" + specifiedRadius); // GOOD - will correctly pass the radius variable value
连接字符串时,不会自动添加空格。因此必须小心,例如当“需要”空格时。
// We want to use the "Li white" threshold

userDefinedAutoThreshold = "Li";
//run("Auto Threshold", "method=" + userDefinedAutoThreshold + "white");   //does NOT work because the macro runs as "method=Liwhite"
run("Auto Threshold", "method=" + userDefinedAutoThreshold + " white");   //WORKS because including a space in " white" results in "method=Li white"
自引用作业
当变量被赋值时,首先计算右侧,然后才执行赋值。这允许您将变量的值加倍:
amount = amount * 2;
首先,评估amount * 2。然后结果被分配回变量amount,有效地将其加倍。
一个非常重要的操作是将变量的值加一:
counter = counter + 1;
它非常重要,因此有一个简短的形式:
// This statement does the same as counter = counter + 1;
counter++;
函数
大多数时候,您将调用函数来实现您想要执行的操作。函数有名称,就像变量一样,但它们也有可以传递给函数的参数。 ImageJ 附带了许多 predefined functions,您可以调用它们来执行特定计算或其他操作。
此示例将 Hello, World! 写入 Log 窗口:
write("Hello, World!");
和以前一样,分号表示语句的结束。函数名称为write,参数列表包含在括号内。对于write,只有一个参数。如果要传递的参数较多,则需要用逗号分隔:
newImage("My pretty new image", "8-bit black", 640, 480, 1);
与 write 一样,newImage 是 ImageJ 的内置函数。参数的顺序是相关的,这是函数知道每个参数含义的方式。
定义函数
对于重复任务,您可以定义自己的函数:
function closeImageByTitle(title) {
        selectWindow(title);
        close();
}
请注意,title 只是另一个variable,它是在调用函数时隐式赋值的。换句话说,此调用将执行上述定义中的代码,并将变量title设置为My pretty new image:
closeImageByTitle("My pretty new image");
评论
当您在六个月后再次阅读代码时,您想了解代码的作用及其原因。为此,您可以添加注释,即 ImageJ 在执行宏时忽略的文本。例子:
// This variable contains the radius of the circle to be drawn
r = 15;
两个斜杠之后直到行尾的所有内容都是注释。
多行注释
您还可以将多行注释包含在 /* ... */ 块中:
/*
 It turned out in practice that 0.5 is a good choice for alpha, because
 it leads to fewer artifacts than anything larger, and it is large enough
 to guarantee a quick convergence.
*/
alpha = 0.5;
注释掉的代码
当阅读其他人编写的宏时,您经常会发现注释掉的代码的概念。这是伪装成注释的代码,因此不会被执行。例子:
a = 0.5;
// write("value of a: " + a);
run("Gaussian Blur...", "radius=" + a);
注释掉的代码的典型用途是帮助调试的指令,但对于宏的常规执行来说太冗长(或太慢)。
条件代码块
有时,当且仅当满足特定条件时,您需要执行代码的特定部分。例子:
// If the image is not binary, abort
if (!is( "binary" )) {
    exit( "You need a binary image for this macro!" );
}
条件块由几个部分组成:if关键字、括号内的条件以及大括号内的代码块。
在这种情况下,条件调用函数is来询问当前图像是否是二进制的,感叹号对结果进行否定,即,当且仅当当前图像是不是二进制时,!is("binary")才产生true(与is("binary")相反,在相反的情况下返回true)。
如果代码块仅由一条语句组成,则可以省略大括号,但保留它们是一种很好的做法(例如,使用大括号的嵌套条件块比不使用大括号更容易理解)。
同样,缩进条件块内的代码(即在块内的行前面添加空格)是一个很好的做法。这也使得阅读代码变得更加容易。
其他
您可以选择添加 else 子句,即当条件不满足时执行的代码块。例子:
if (is("binary")) {
        write("The current image is binary");
}
else {
        write("The current image is not binary");
}
循环
第一个例子
为了多次重复指令,需要使用循环。例子:
for (i = 0; i < 10; i++) {
        run("Dilate");
}
此代码将运行 Dilate 命令十次。 for循环的语法由for关键字、后跟括号内的三个语句以及要执行的代码块组成。
定义运行代码块的频率的三个语句是
- 初始化器:通常,计数器变量被初始化,在本例中将
i初始化为值零, 2.条件:只要满足这个条件(这里i < 10),代码块就被执行, - 增量器:该语句在代码块之后执行,就在再次测试该块是否应该再次执行之前。
在此示例中,变量i首先被初始化为零,然后检查条件,并且由于i小于10,因此执行代码块。之后,i 递增,并再次检查条件。由于1仍然小于10,所以再次执行该代码块。对于值 2, 3, …, 9 重复此操作,但在变量 i 从 9 增加到 10 后,条件不再成立,因此循环结束。
当然,即使本示例中的代码块内没有使用计数器变量,您也可以自由地这样做。
请注意,从 0 开始并测试“小于 10”条件将导致代码块运行 10 次。这是执行特定代码块固定次数的标准方法。
循环堆栈的切片
要循环堆栈,可以使用变量nSlices。
#@ImagePlus (label="Some stack") image

selectImage(image);
for (i=1; i<=nSlices; i++) {
    setSlice(i);
    run("Duplicate...", "title=Slice");
    // do some processing
}
在 RoiManager 中循环 rois
这个小的 IJmacro scriptlet 在 Roi Manager 中的 roi 上循环,一次选择一个。
for (i = 0; i < roiManager("count"); i++){
     roiManager("Select", i);
     // do some operation
}
录音机
通常,宏不是从头开始编写的,而是使用宏记录器进行记录:只需单击 Plugins › Macros › Record… 并执行一些操作。这些操作将记录在记录器窗口中,您可以单击在编辑器中打开记录的指令:
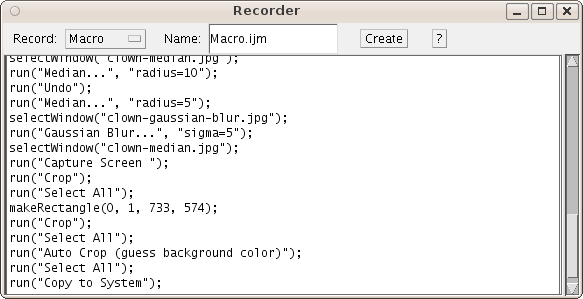
在某些情况下,您可能需要编辑录制的宏,使其可与用于录制宏的图像以外的其他图像一起使用。示例:当您合并频道时,您最终会得到如下语句:
run("Merge Channels...",
    "red=[Edges of boats.gif] green=boats.gif blue=boats.gif gray=*None*");
传递给合并通道…的参数很大程度上取决于当前图像的名称。一种可能的解决方案如下所示:
title = getTitle();
run("Merge Channels...",
     "red=[Edges of " + title + "] green=" + title + " blue=" + title + " gray=*None*");
请注意,我们需要使用字符串连接来插入当前图像的名称来代替 boats.gif,如above中所述。
为了允许名称中包含空格,您可能还需要在标题周围添加额外的 [...]:
title = getTitle();
run("Merge Channels...",
     "red=[Edges of " + title + "] green=[" + title + "] blue=[" + title + "] gray=*None*");
安装宏
要安装键盘快捷键或工具图标,您需要wrap macro code in macro blocks:
macro "Title of the macro" {
       write("Hello, world!");
}
然后你需要安装它们:
只需将宏保存在 ./ImageJ/scripts/ 的 plugins 子文件夹中(例如 ./ImageJ/scripts/Plugins/MyScripts/My_Macro.ijm),重新启动程序后它将出现在相应的菜单中(例如Plugins › MyScripts › My Macro)。

注意:Plugins › Macros › Install… 命令是原始 ImageJ 的命令,尚不支持随 ImageJ2 引入的 SciJava Script Parameters 语法 (#@)。
键盘快捷键
可以通过在宏名称末尾的括号内添加键来定义键盘快捷键。这些键盘热键仅在 registered as shortcuts 时才有效。
例子:
// install a keyboard shortcut: when pressing J,
// the user is asked for JPEG quality and for a location
// to save the current image as .jpg file

macro "Save As JPEG... [j]" {
    quality = call("ij.plugin.JpegWriter.getQuality");
    quality = getNumber("JPEG quality (0-100):", quality);
    run("Input/Output...", "jpeg="+quality);
    saveAs("Jpeg");
}
确保使用 Plugins › Shortcuts › Add Shortcut… 注册快捷方式
工具图标
通过选择以 Action Tool 结尾的宏名称,您可以将新工具安装到工具栏中:
// A click on the empty rectangle will have the same
// effect as <span class="bc"><span>File</span> › <span>Save As</span> › <span>Jpeg...</span></span>

macro "Save As JPEG Action Tool - C000R11ee" {
    saveAs("Jpeg");
}
该图标由一个看起来很有趣的字符串定义(在本例中为C000R11ee)。要了解如何定义自己的图标,请查看here。
许多工具在双击图标时会打开选项对话框。您也可以通过选择以 Action Tool Options 结尾的名称来做到这一点:
// A right-click on the tool icon lets the user change
// the JPEG Quality

macro "Save As JPEG Action Tool Options" {
    quality = call("ij.plugin.JpegWriter.getQuality");
    quality = getNumber("JPEG quality (0-100):", quality);
    run("Input/Output...", "jpeg="+quality);
}
宏示例
本节包含许多宏,您可以将它们用作编写自己的宏的起点。
如果您有兴趣对给定文件夹中的所有文件执行特定过程,您可能需要查看教程How to apply a common operation to a complete directory或通过Templates › Macros › Process Folder在Script Editor中打开的宏模板。
调整为选择范围的给定宽度
当您需要调整图像大小但您只知道选择作为 ROI 的结构的宽度(以像素为单位)时,此宏适合您:
desiredSelectionWidth = 480;

roiType = selectionType();
getSelectionCoordinates(x, y);
getSelectionBounds(dummy, dummy, selectionWidth, selectionHeight);
factor = desiredSelectionWidth / selectionWidth;
newWidth = round(factor * getWidth());
newHeight = round(factor * getHeight());
run("Select None");
run("Size...", "width=" + newWidth + " height=" + newHeight
    + " average interpolation=Bicubic");
for (i = 0; i < x.length; i++) {
    x[i] = round(x[i] * factor);
    y[i] = round(y[i] * factor);
}
makeSelection(roiType, x, y);
分割时间点
该宏将 hyperstack 分割为单独的时间点,以便您最终得到与原始 hyperstack 具有帧数一样多的新图像:
/* split timepoints */

// remember the original hyperstack
id = getImageID();

// we need to know only how many frames there are
getDimensions(dummy, dummy, dummy, dummy, nFrames);

// for each frame...
for (frame = 1; frame <= nFrames; frame++) {
    // select the frame
    selectImage(id);
    Stack.setPosition(1, 1, frame);

    // extract one frame
    run("Reduce Dimensionality...", "channels slices keep");
}

// close the original hyperstack
selectImage(id);
close();
合并时间点
该宏的作用与之前的宏相反:它将所有打开的图像合并到一个大的超堆栈中,假设它们是一部电影的不同时间点。
// join frames

// get the dimensions
title = getTitle();
getDimensions(width, height, channelCount, sliceCount, frameCount);

if (frameCount > 1)
    exit("Only stacks with 1 timepoint may be open!");

// verify that all images have correct dimensions
setBatchMode(true);
imageCount = nImages;
for (image = 1; image <= imageCount; image++) {
    selectImage(image);
    getDimensions(width2, height2, channelCount2, sliceCount2, frameCount2);
    if (width2 != width || height2 != height || channelCount2 != channelCount ||
            sliceCount2 != sliceCount || frameCount2 != frameCount)
        exit("Dimensions of " + getTitle() + " do not match dimensions of " + title + ": "
            + width2 + "x" + height2 + "x" + channelCount2 + "x" + sliceCount2 + "x" + frameCount2 + " are not "
            + width2 + "x" + height + "x" + channelCount + "x" + sliceCount + "x" + frameCount + "!");
}

// now rename all images so that the names are unique
for (image = 1; image <= imageCount; image++) {
    selectImage(image);
    rename("image-" + image);
}

// now concatenate one by one
selectImage("image-1");
rename("image-0");
for (image = 1; image < imageCount; image++) {
    run("Concatenate...", "stack1=image-" + (image - 1) + " stack2=image-" + (image + 1) + " title=image-" + image);
}

// there is only one image left; rename it to the original title
rename(title);

// set the correct dimensions
Stack.setDimensions(channelCount, sliceCount, imageCount);

// show the image
selectImage(title);
setBatchMode(false);
将所有图像标准化为全局平均值
该宏获取所有打开图像的平均值,然后将每个图像中的像素值调整为该平均值:
setBatchMode(true);

total = 0;
for (i = 1; i <= nImages; i++) {
    selectImage(i);
    getRawStatistics(dummy, mean, dummy, dummy, dummy, dummy2);
    total = total + mean;
}
total = total / nImages;

for (i = 1; i <= nImages; i++) {
    selectImage(i);
    getRawStatistics(dummy, mean, dummy, dummy, dummy, dummy2);
    difference = total - mean;
    run("Add...", "value=" + difference);
}

setBatchMode(false);
制作假彩色蒙太奇
这是一个更复杂的宏,也许你可以通过阅读代码猜出它是怎么做的?之后,您可能想在小丑示例上尝试一下……
function simplifyColors() {
    run("Duplicate...", "title=step-1");
    run("HSB Stack");
    setSlice(2);
    stack = getImageID();
    run("Duplicate...", "title=threshold");
    run("Gamma...", "value=0.30");
    run("Bilateral Filter", "spatial=15 range=150");
    run("Select All");
    run("Copy");
    close();
    selectImage(stack);
    run("Paste");
    setSlice(1);
    run("Duplicate...", "title=bilateral");
    run("Bilateral Filter", "spatial=15 range=150");
    run("Enhance Contrast", "saturated=0.4");
    run("Select All");
    run("Copy");
    close();
    selectImage(stack);
    run("Paste");
    run("RGB Color");
}

function warholize(order, invertR, invertG, invertB) {
    if (order == 0)
        order = "1,2,3";
    else if (order == 1)
        order = "1,3,2";
    else if (order == 2)
        order = "2,1,3";
    else if (order == 3)
        order = "2,3,1";
    else if (order == 4)
        order = "3,1,2";
    else if (order == 5)
        order = "3,2,1";
    run("Make Substack...", "slices=" + order);
    if (invertR != 0) {
        setSlice(1);
        run("Invert", "slice");
    }
    if (invertG != 0) {
        setSlice(2);
        run("Invert", "slice");
    }
    if (invertB != 0) {
        setSlice(3);
        run("Invert", "slice");
    }
    run("Stack to RGB");
}

function makeMontage(big) {
    orig = getImageID();
    w = getWidth();
    h = getHeight();

    columns = 3;
    rows = 3;
    orders = newArray(3, 4, 5, 1, 3, 5, 5, 1, 2);
    inverts = newArray(6, 5, 7, 1, 4, 1, 0, 2, 0);

    if (big) {
        columns = 8;
        rows = 6;
        orders = newArray(columns * rows);
        inverts = newArray(columns * rows);
        for (column = 0; column < columns; column++)
            for (row = 0; row < rows; row++) {
                index = column + columns * row;
                orders[index] = row;
                inverts[index] = column;
            }
    }
    else if (randomize) {
        for (i = 0; i < orders.length; i++) {
            orders[i] = floor(random() * 5.999);
            inverts[i] = 1 * floor(random() * 1.2)
                + 2 * floor(random() * 1.2)
                + 4 * floor(random() * 1.2);
            // avoid duplicates
            for (j = 0; j < i; j++)
                if ((orders[j] == orders[i] && inverts[j] == inverts[i])
                        || (orders[i] == 0 && inverts[i] == 0)) {
                    i--;
                    j = i;
                }
        }
    }

    // create the panel
    newImage("Warhol'ized " + getTitle(), "RGB white",
        (w + 1) * columns + 1, (h + 1) * rows + 1, 1);
    result = getImageID();

    // for speed, and to minimize user interference, start the batch mode
    setBatchMode(true);
    selectImage(orig);
    run("Duplicate...", "title=stack");
    run("RGB Color");
    simplifyColors();
    run("RGB Stack");
    stack = getImageID();

    // fill the panel
    for (column = 0; column < columns; column++)
        for (row = 0; row < rows; row++) {
            selectImage(stack);
            index = column + columns * row;
            i = inverts[index];
            warholize(orders[index], i & 1, i & 2, i & 4);

            // copy the false-color image into the clipboard
            makeRectangle(0, 0, w, h);
            run("Copy");
            close();

            // paste the clipboard, at the correct location
            selectImage(result);
            makeRectangle((w + 1) * column + 1, (h + 1) * row + 1, w, h);
            run("Paste");
        }

    run("Select None");
    selectImage(stack);
    close();
    setBatchMode(false);
}

randomize = true;
makeMontage(false);
模仿 BioRad MRC600 共焦中的合并侧面命令
模拟原始 BioRad MRC600 共焦中合并侧面命令的宏。
有关原始图像示例,请参阅http://www.flickr.com/photos/mcammer/1618746622/
有关示例结果,请参阅http://www.flickr.com/photos/mcammer/8551068739/
分割灰度图像并合并。在堆栈上工作。
Michael Cammer 编辑:Johannes Schindelin 2013-03-12
macro "Split and Merge" {
  width = getWidth();
  height = getHeight();
  if ( (width % 2) == 0  ) exit("Image not even # pixels wide.");
  makeRectangle(0, 0, width/2, height);
  right = getImageID();
  slices = nSlices;
  run("Duplicate...", "title=LEFT duplicate range=1-"+slices);
  selectImage(right);
  makeRectangle(width/2, 0, width/2, height);
  run("Crop");
  rightTitle = getTitle();
  run("Merge Channels...", "c1=LEFT c2="+right);
  rename("merged_"+right);
}  // end
更多示例宏
ImageJ website 上有相当多的宏,特别是 example macros,包括来自 ImageJ conference 2010 的宏研讨会的一些宏。由于没有分类索引,您可能需要使用 this page 上的搜索功能。
克服限制
与其他 scripting 语言相比,宏有一个主要限制:它们只有 fixed set of built-in functions。但有时,人们需要访问该领域之外的功能;在这种情况下,可以通过三种主要方法来克服此限制:
宏扩展
可以在 Java 中实现代码,通过 Ext prefix 扩展宏语言。然而,这不能在宏本身内完成。
调用函数
call function可以直接调用Java方法。但是,此函数仅支持调用仅接受 String 并仅返回 String 的 public static Java 方法。但大多数时候,所需的功能并不符合这些要求;这种方法主要适用于设计为以这种方式从宏语言调用的例程。
评估函数
eval function可以直接执行JavaScript(或BeanShell或Python)代码。这是一种强大而灵活的方法,可以调用几乎任何 Java API,而无需编写外部 Java 代码。
下面是设置 3D Viewer 窗口位置的示例:
run("MRI Stack (528K)");
run("3D Viewer");
call("ij3d.ImageJ3DViewer.add", "mri-stack.tif", "None", "mri-stack.tif", "0", "true", "true", "true", "2", "0");

// Loop over all frames to find the 3D Viewer window(s)
x = 200;
y = 300;
eval("script",
    "frames = java.awt.Frame.getFrames();" +
    "for (f=0; f<frames.length; f++) {" +
    "  frame = frames[f];" +
    "  if (\"ImageJ 3D Viewer\".equals(frame.getTitle())) {" +
    "    frame.setLocation(" + x + ", " + y + ");" +
    "  }" +
    "}"
);
执行函数
exec function 可以使用可选参数调用任何外部程序或进程。
它可以用于例如分析后自动打开带有结果表的表格软件。它还可用于在默认浏览器中打开特定网页。
参见Examples。
请注意,宏代码将等待外部进程终止,然后才继续执行其余代码(打开网页或 Excel 时除外)。
如果您不希望宏等到外部进程结束,您可以调用该命令
setOption("WaitForCompletion", false);
在 exec 调用之前。 (自 ImageJ 1.52u38 起)
进一步的文档
宏语言的完整描述、内置函数的参考和示例可以在here中找到。
