

This page explains how to develop plugins with the original ImageJ API. If you start developing a new plugin today, it is highly recommended to develop for ImageJ2.
插件、脚本还是宏?
如果您想向 ImageJ 添加新功能,您可以write a script or macro,或者将其作为插件进行。脚本和宏更容易学习,因此通常开发速度更快。然而,Java 提供了许多优势,包括在许多情况下更好的性能以及代码的编译时安全性。
如果您不确定选择哪个,请查看Scripting Help并尝试使用您感兴趣的语言编写脚本。如果执行速度成为问题,您可以稍后将其转换为 Java 插件。
如果您确定要用 Java 编写插件,请继续阅读!
插件
什么是插件(就文件而言)?
- 插件是扩展 ImageJ/Fiji 的专用机制
- 插件由位于
plugins/中的.jar文件中的一个或多个 Java 类组成(例外:单个.class文件) - 所有插件
.jar(或.class)文件的名称中必须包含下划线 - 插件可以使用第三方库;在斐济,将它们存储在
jars/目录中(在 ImageJ 中,您必须将它们放入plugins/目录中,并且为了避免 Plugins 菜单中出现有趣的菜单条目,如果它们的名称包含下划线,您应该重命名它们)
更新插件
- 将
.jar文件存储到plugins/(或jars/)目录后,调用Help › Refresh Menus或重新启动斐济 - 如果正在使用相应的插件,则由于 Sun Java 处理
.jar文件的限制,刷新菜单时您可能会得到有趣的结果。
什么是插件(就菜单条目而言)?
- 如果
.jar文件包含名为plugins.config的文件,它确定插件提供哪些菜单项 - 如果
.jar文件不包含名为plugins.config的文件,则所有包含的名称中包含下划线的类都将添加到Plugins菜单中
plugins.config 文件如下所示:
# Comments (such as title, author, etc)
#
# The other lines have this format:
#  Menu, "Menu Item", ClassName
# Example:

Plugins > Analyze, "Plot", fiji.Plot
通过在 plugins.config 文件中传递可选参数,一个类可以重用于多个菜单条目:
# Example how to reuse a Java class

Help, "Bug report", fiji.Send("bug")
Help, "Contact", fiji.Send("contact")
什么是插件(就 Java 代码而言)?
有两种不同类型的插件:
- 在一张图像上运行的插件
- 所有其他插件(包括需要多个输入图像或图像格式加载器的插件)
过滤器插件如下所示:
public class My_Plugin implements PlugInFilter {
    public int setup(String arg, ImagePlus image) {
        return DOES_ALL;
    }
    public void run(ImageProcessor ip) {
        // Here is the action
    }
}
一个通用的插件看起来像这样:
public class My_Plugin implements PlugIn {
    public void run(String arg) {
        // Here is the action
    }
}

It is of course possible to implement a filter plugin using the PlugIn interface, but ImageJ will perform more convenience functions if you use the PlugInFilter interface, such as verifying that there is an image and that it is of the correct type, and error handling.
限制
- 插件只能实现菜单项(特别是,它们不能提供工具栏中的工具)
- 一些易于通过宏调用的函数无法通过公共 Java API 获得(例如Image › Stacks › Plot Z-axis profile…)
- 编写宏通常更快
Maven 入门
example-legacy-plugin project 提供了一个工作示例和文档,说明了如何从“Maven 中的最佳实践”的角度构建 ImageJ 插件。
使用此项目需要对Git和Maven有基本的了解;因此,如果您已经熟悉 ImageJ 1.x API,那么这是学习 ImageJ2 development 中使用的 project management 工具的合理起点。
基本工作流程
所有插件开发都倾向于遵循一致的“设计 - 构建 - 测试”工作流程。实际上,这看起来像:
- 更改源代码(例如在 Eclipse 中)
- 从源代码构建插件的 .jar(例如使用 Maven)
- 将插件移至现有 ImageJ 安装的plugins directory -(重新)启动 ImageJ 并运行插件来测试行为
…并重复直到您的插件按预期工作。
ImageJ 的 API
各种斐济相关项目的源代码分布在多个源代码存储库中,它们的 API 文档也是如此。所有 javadoc 资源的概述可以在 this page with javadoc links 上找到。
类 IJ
类ij.IJ是一个具有许多静态函数的便利类。其中两个对于调试特别有用:
// output into the Log window
IJ.log("Hello, World!");

// Show a message window
IJ.showMessage("Hello, World!");
类 ImageJ
类ij.ImageJ实现了ImageJ / Fiji的主窗口,你可以通过ij.IJ的静态方法getInstance()访问它:
// check if ImageJ is used interactively
if (IJ.getInstance() != null)
    IJ.showMessage("Interactive!");
通常,您对该实例所做的只是测试 ImageJ 是否用作库(在这种情况下该实例为 null)。
类 WindowManager
使用类 ij.WindowManager 访问 ImageJ 窗口/图像:
// how many windows / images are active?
IJ.log("There are "
    + WindowManager.getNonImageWindows().length
    + " windows and "
    + WindowManager.getImageCount()
    + " images!");
实现过滤器插件时,通常不需要直接访问WindowManager。
表示图像的类的层次结构
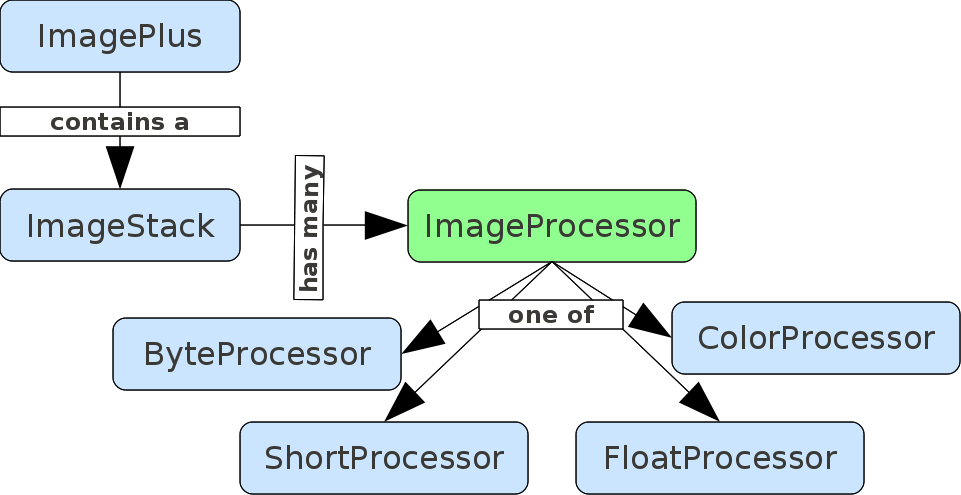
所有图像均表示为 ij.ImagePlus 的实例。此类包装了第 ij.ImageStack 个切片。切片是 ij.process.ImageProcessor 的数据类型相关实例:ij.process.ByteProcessor、ij.process.ShortProcessor、ij.process.FloatProcessor 和 ij.process.ColorProcessor。或者以图形方式:
Image class hierarchy
用法示例:
// get the current image
ImagePlus image = WindowManager.getCurrentImage();

// get the current slice
ImageProcessor ip = image.getProcessor();

// duplicate the slice
ImageProcessor ip2 = ip.duplicate();
超越 3D:Hyperstacks
在 ImageJ 中,您可以表示图像中的 3 个以上维度:X、Y、Z、通道、帧(时间)。在内部,这些 5 维图像仍然表示为图像堆栈(本质上是 ImageProcessor 实例的一维数组)。不过,ImagePlus 类知道如何将(通道、z 切片、帧) 三元组转换为ImageStack 中的相应索引:
// get the n'th slice (1 <= n <= N!)
ImageStack stack = image.getStack();
int size = stack.getSize();
ImageProcessor ip = stack.getProcessor(size);

// get the ImageProcessor for a given
// (channel, slice, frame) triple
int index = image.getStackIndex(channel, slice, frame);
ImageProcessor ip = stack.getProcessor(index);
For historical reasons, slice indices (and channel and frame indices as well) start at 1. This is in contrast, e.g. to the x, y coordinates, which start at 0 (as one might be used to from other computer languages except BASIC, Pascal and MATLAB).
使用像素值
ImageProcessor 类的子类实现特定数据类型(8 位、16 位、32 位浮点和 RGB 颜色)的二维图像。让我们从灰度开始:
// get one pixel's value (slow)
float value = ip.getf(0, 0);
这将为您提供 ImageProcessor 类型的对象 ip 左上角像素的值,作为 32 位浮点值。
由于原始数据类型可能是 8 位,因此该操作可能需要 cast(类型转换),如果经常执行,其成本可能会相当高。因此,如果您知道图像的数据类型,则可以编写更高效(但取决于数据类型)的代码:
// get all type-specific pixels (fast)
// in this example, a ByteProcessor
byte[] pixels = (byte[])ip.getPixels();
int w = ip.getWidth(), h = ip.getHeight();
for (int j = 0; j < h; j++)
	for (int i = 0; i < w; i++) {
		// Java has no unsigned 8-bit data type, so we need to perform Boolean arithmetics
		int value = pixels[i + w * j] & 0xff;
		...
	}
The previous example assumes that your images are 8-bit (unsigned, i.e. values between 0 and 255) images. Since Java has no data type for unsigned 8-bit integers, we have to use the & 0xff dance (a Boolean AND operation) to make sure that the value is treated as unsigned integer.
当涉及 RGB 图像时,访问像素值会变得更加棘手。它们使用本机数据类型 int(32 位有符号整数)来编码 3 个颜色通道 à 8 位,打包到低 24 位中(请注意,ImageJ 可能将内容存储在高 8 位中,因此您不能假设它们为 0)。因此,ImageProcessor 类的 getf() 方法对于彩色图像没有意义。您必须像这样访问像素:
// get all pixels of a ColorProcessor
int[] pixels = (int[])ip.getPixels();
int w = ip.getWidth(), h = ip.getHeight();
for (int j = 0; j < h; j++)
	for (int i = 0; i < w; i++) {
		int value = pixels[i + w * j];
		// value is a bit-packed RGB value
		int red = value & 0xff;
		int green = (value >> 8) & 0xff;
		int blue = (value >> 16) & 0xff;
}
制作新图像
要制作新图像(无论是 2、3、4 或 5 维),您必须首先创建 ImageProcessor 的实例。例子:
ImageProcessor gradient(double angle, int w, int h) {
	float c = (float)Math.cos(angle);
	float s = (float)Math.sin(angle);
	float[] p = new float[w * h];
	for (int j = 0; j < h; j++)
		for (int i = 0; i < w; i++)
			p[i + w *j] = (i – w / 2) * c + (j – h / 2) * s;
	return new FloatProcessor(w, h, p, null);
}
此示例实现了一种显示沿给定角度的渐变的方法。您可以使用此方法构建 3 维图像:
// make a stack of gradients
int w = 512, h = 512;
ImageStack stack = new ImageStack(w, h);
for (int i = 0; i < 180; i++)
	stack.addSlice("", gradient(i / 180f * 2 * Math.PI, w, h));
ImagePlus image = new ImagePlus("stack", stack);
// you do not need to show intermediate images
image.show();
通知用户进度
此代码片段向您展示了如何更新进度条和状态文本:
// show a progress bar
for (int i = 0; i < 100; i++) {
	// do something
	IJ.showProgress(i + 1, 100);
}

// show something in the status bar
IJ.showStatus("Hello, world!");
Calling IJ.showProgress(n, n); will hide the progress bar; Therefore, it makes sense to update the progress bar at the end of a loop iteration, so that after the last iteration, the progress bar is hidden.
常用运算符
ImageProcessor类有一些方法,例如smooth()、sharpen()、findEdges()等
提示:使用工具菜单中的脚本编辑器功能:
- 打开类的帮助…(在浏览器中打开类的 JavaDoc),
- 打开类的 .java 文件…(要求 Fiji 目录中存在相应的源文件,例如在 Downloading and Building Fiji From Source 之后,或
- 打开菜单项的.java 文件…(还需要源文件)。
情节
您可以使用 Plot 类非常轻松地显示绘图窗口:
void plot(double[] values) {
	double[] x = new double[values.length];
	for (int i = 0; i < x.length; i++)
		x[i] = i;
	Plot plot = new Plot("Plot window", "x", "values", x, values);
	plot.show();
}
将多个绘图放入一个窗口几乎同样容易:
void plot(double[] values, double[] values2) {
	double[] x = new double[values.length];
	for (int i = 0; i < x.length; i++)
		x[i] = i;
	Plot plot = new Plot("Plot window", "x", "values", x, values);
	plot.setColor(Color.RED);
	plot.draw();
	plot.addPoints(x, values2, Plot.LINE);
	plot.show();
}
要更新绘图窗口的内容,请记住 plot.show() 的返回值(PlotWindow),并使用其 drawPlot() 方法:
void plot(double[] values) {
	...
	PlotWindow plotWindow = plot.show();
	...
	Plot plot = new Plot("Plot window", "x", "values", x, values);
	plotWindow.drawPlot(plot);
}
结果表
每当您的插件量化图像中的内容时,您可能希望在结果表中输出值:
ResultsTable rt = Analyzer.getResultsTable();
if (rt == null) {
	rt = new ResultsTable();
	Analyzer.setResultsTable(rt);
}
for (int i = 1; i <= 10; i++) {
	rt.incrementCounter();
	rt.addValue("i", i);
	rt.addValue("log", Math.log(i));
}
rt.show("Results");
感兴趣的区域
您可以通过以下方式访问 ROI:
// testing ROI type
if (roi != null && roi.getType() == Roi.POLYGON)
	IJ.log("This is a polygon!");
showCoordinates((PolygonRoi)roi);

...

// get ROI coordinates
void showCoordinates(PolygonRoi polygon) {
	PolygonRoi polygon = (PolygonRoi)roi;
	int[] x = polygon.getXCoordinates();
	int[] y = polygon.getYCoordinates();
	Rectangle bounds = polygon.getBounds();
	for (int i = 0; i < x.length; i++)
		// x, y are relative to the bounds' origin
		IJ.log("point " + i + ": " + (x[i] + bounds.x) + (y[i] + bounds.y));
}
If the image has no ROI set, then getRoi() will return null, so you must check whether roi != null before accessing fields or methods on the object.
当然,您也可以通过编程方式设置 ROI:
// rectangular ROI
Roi roi = new Roi(10, 10, 90, 90);
image.setRoi(roi);

// oval ROI
Roi roi = new OvalRoi(10, 10, 90, 90);
image.setRoi(roi);
从 ImageJ 1.x 调用 ImageJ2
您可以在 ImageJ 1.x 插件中使用 ImageJ2 特定的功能。例如,ImageJ2 提供了一个类似电子表格的结果表,支持字符串单元格。您可以编写一个 ImageJ 1.x 插件来生成这样的电子表格,并将其显示在屏幕上。
请参阅 ImageJ 教程代码中的 ModernFromLegacy.java 示例。
更多提示
另请参阅开发人员提示如何use ImageJ’s API effectively。
后续步骤
请参阅以下指南:
