


自迁移出 MediaWiki 以来,本页内容尚未经过审查。如果您愿意帮忙,请查看帮助指南!
Scripting 是斐济如此强大的原因之一,而可训练的 Weka Segmentation 库(包括 Trainable Weka Segmentation plugin)是可编写脚本的斐济组件的最佳示例之一。
开始使用
开始编写可训练 Weka 脚本脚本时,您需要做的第一件事是了解可以使用哪些方法。因此,请查看可训练 Weka 分割** 库的 **API,可在该 here 中使用。
让我们通过使用 Beanshell 编写的示例来了解一下基本命令:
初始化
为了包含所有库的方法,最简单(但不优雅)的方法是导入整个库:
import trainableSegmentation.*;
现在我们准备开始玩了。我们可以打开输入图像将其分配给WekaSegmentation对象或分割器:
// input train image
input  = IJ.openImage( "input-grayscale-or-color-image.tif" );
// create Weka Segmentation object
segmentator = new WekaSegmentation( input );
现在分类器,具有默认参数和默认分类器。这意味着将使用 Trainable Weka Segmentation plugin中默认设置的相同特征,2个类(称为“类1”和“类2”)和一个随机森林器,每个节点有200棵树和2个随机特征。如果我们对此感到满意,我们现在可以为训练数据添加一些标签,并根据它们训练分类器。
添加训练样本
向数据添加标签的方法有多种:
1) 我们可以使用“addExample”将任何类型的ROI添加到任何现有类:
// add pixels to first class (0) from ROI in slice # 1
segmentator.addExample( 0, new Roi( 10, 10, 50, 50 ), 1 );
// add pixels to second class (1) from ROI in slice # 1
segmentator.addExample( 1, new Roi( 400, 400, 30, 30 ), 1 );
2) 添加二值图像中的标签,其中白色像素属于一类,黑色像素属于另一类。有几种方法可以实现这一点,例如:
// open binary label image
labels  = IJ.openImage( "binary-labels.tif" );
// for the first slice, add white pixels as labels for class 2 and
// black pixels as labels for class 1
segmentator.addBinaryData( labels, 0, "class 2", "class 1" );
3) 您还可以从新的输入图像相应的标签添加样本:
// open new input image
input2  = IJ.openImage( "input-image-2.tif" );
// open corresponding binary label image
labels2  = IJ.openImage( "binary-labels-2.tif" );
// for all slices in input2, add white pixels as labels for class 2 and
// black pixels as labels for class 1
segmentator.addBinaryData( input2, labels2, "class 2", "class 1" );
4) 如果您想平衡每个类别的样本数量,您可以使用以下其他方法以类似的方式进行操作:
numSamples = 1000;
// for all slices in input2, add 1000 white pixels as labels for class 2 and
// 1000 black pixels as labels for class 1
segmentator.addRandomBalancedBinaryData( input2, labels2, "class 2", "class 1" , numSamples);
5) 您可以使用 API 中提供的所有方法以多种不同的方式从二进制图像添加标签。请查看它们并决定哪一个更适合您的需求。
训练分类器
一旦我们有了两个类别的训练样本,我们就可以训练分割器的分类器了:
segmentator.trainClassifier();
###应用分类器(获取结果)
一旦分类器被训练(将显示在日志窗口训练中),我们就可以将其评估整个图像并获得每个类别的标记图像或概率图形式的结果:
// apply classifier to current training image and get label result
// (set parameter to true to get probabilities)
segmentator.applyClassifier( false );
// get result (float image)
result = segmentator.getClassifiedImage();
当然,我们可能会感兴趣将经过训练的分类器评估全新的 2D 图像或堆栈。在这种情况下我们使用:
// open test image
testImage = IJ.openImage( "test-image.tif" );
// get result (labels float image)
result = segmentator.applyClassifier( testImage );
使用与 GUI 中相同的标签颜色
如果您喜欢插件 GUI 中使用的查找表,您也可以通过Smashing 方式将其设置为结果标签:
import trainableSegmentation.utils.Utils;
// apply classifier and get results as labels (same as before)
result = segmentator.applyClassifier( image, 0, false );

// assign same LUT as in GUI
result.setLut( Utils.getGoldenAngleLUT() );
保存/加载操作
如果您训练的分类器足以满足您的目的,您可能需要将其保存到文件中:
// save classifier into a file (.model)
segmentator.saveClassifier( "my-cool-trained-classifier.model" );
…然后将其加载到另一个脚本中,并将其应用到新图像上:
// load classifier from file
segmentator.loadClassifier( "my-cool-trained-classifier.model" );
您可能还想将训练数据保存到稍后可以在 WEKA 中打开的文件中:
// save data into a ARFF file
segmentator.saveData( "my-traces-data.arff" );
…或将包含跟踪信息的文件加载到主板中以将其初始化训练的一部分:
// load training data from ARFF file
segmentator.loadTrainingData( "my-traces-data.arff" );
测试模式
从 Trainable Weka Segmentation v3.2.8 开始,分类器可以加载到没有训练图像的 WekaSegmentation 对象中,即仅用于测试目的:
// create testing segmentator
segmentator = new WekaSegmentation();
// load classifier from file
segmentator.loadClassifier( "my-cool-trained-classifier.model" );
将其应用程序放置到任何测试图像中,就像我们上面所做的那样(请参阅“应用分类器”部分)。
分类器
默认情况下,分类器是随机森林的多线程实现。您可以将其更改为 WEKA API 中可用的任何其他分类器。例如,我们可以使用SMO:
import weka.classifiers.functions.SMO;
// create new SMO classifier (default parameters)
classifier = new SMO();
// assign classifier to segmentator
segmentator.setClassifier( classifier );
我们可能还想使用默认的随机森林,但调整其参数。在这种情况下,我们可以这样写:
import hr.irb.fastRandomForest.FastRandomForest;
// create random forest classifier
rf = new FastRandomForest();
// set number of trees in the forest
rf.setNumTrees( 100 );
// set number of features per tree (0 for automatic selection)
rf.setNumFeatures( 0 );
// set random seed
rf.setSeed( (new java.util.Random()).nextInt() );

// set classifier
segmentator.setClassifier( rf );
示例:将分类器检查文件夹中的所有图像
很多,我们最终可能不得不使用我们与Trainable Weka Segmentation插件的GUI进行训练交互的分类器来处理大量图像时。以下Beanshell脚本显示了如何从文件加载分类器,将其评级另一个文件夹中包含的所有图像并将结果保存在用户定义的文件夹中:
#@ File(label="Input directory", description="Select the directory with input images", style="directory") inputDir
#@ File(label="Output directory", description="Select the output directory", style="directory") outputDir
#@ File(label="Weka model", description="Select the Weka model to apply") modelPath
#@ String(label="Result mode",choices={"Labels","Probabilities"}) resultMode

import trainableSegmentation.WekaSegmentation;
import trainableSegmentation.utils.Utils;
import ij.io.FileSaver;
import ij.IJ;
import ij.ImagePlus;

// starting time
startTime = System.currentTimeMillis();

// caculate probabilities?
getProbs = resultMode.equals( "Probabilities" );

// create segmentator
segmentator = new WekaSegmentation();
// load classifier
segmentator.loadClassifier( modelPath.getCanonicalPath() );

// get list of input images
listOfFiles = inputDir.listFiles();
for ( i = 0; i < listOfFiles.length; i++ )
{
    // process only files (do not go into sub-folders)
    if( listOfFiles[ i ].isFile() )
    {
        // try to read file as image
        image = IJ.openImage( listOfFiles[i].getCanonicalPath() );
        if( image != null )
        {
            // apply classifier and get results (0 indicates number of threads is auto-detected)
            result = segmentator.applyClassifier( image, 0, getProbs );

            if( !getProbs )
                // assign same LUT as in GUI
                result.setLut( Utils.getGoldenAngleLUT() );

            // save result as TIFF in output folder
            outputFileName = listOfFiles[ i ].getName().replaceFirst("[.][^.]+$", "") + ".tif";
            new FileSaver( result ).saveAsTiff( outputDir.getPath() + File.separator + outputFileName );

            // force garbage collection (important for large images)
            result = null;
            image = null;
            System.gc();
        }
    }
}
// print elapsed time
estimatedTime = System.currentTimeMillis() - startTime;
IJ.log( "** Finished processing folder in " + estimatedTime + " ms **" );
示例:将分类器查看文件夹按图块中的所有图像
在某些情况下,我们可能必须将保存的分类器识别非常大的图像,这些图像与大量图像特征一起可能会填满我们机器的RAM。为了防止出现内存不足的异常,以下Beanshell脚本演示了如何从文件加载分类器,通过将其解析为更小的块来将其过滤文件夹中包含的所有图像,并将结果保存在用户定义的另一个文件夹中:
#@ File(label="Input directory", description="Select the directory with input images", style="directory") inputDir
#@ File(label="Output directory", description="Select the output directory", style="directory") outputDir
#@ File(label="Weka model", description="Select the Weka model to apply") modelPath
#@ String(label="Result mode",choices={"Labels","Probabilities"}) resultMode
#@ Integer(label="Number of tiles in X:", description="Number of image subdivisions in the X direction", value=3) xTiles
#@ Integer(label="Number of tiles in Y:", description="Number of image subdivisions in the Y direction", value=3) yTiles
#@ Integer(label="Number of tiles in Z (set to 0 for 2D processing):", description="Number of image subdivisions in the Z direction (ignored when using 2D images)", value=3) zTiles

import trainableSegmentation.WekaSegmentation;
import trainableSegmentation.utils.Utils;
import ij.io.FileSaver;
import ij.IJ;
import ij.ImagePlus;

// starting time
startTime = System.currentTimeMillis();

// caculate probabilities?
getProbs = resultMode.equals( "Probabilities" );

// create segmentator
segmentator = new WekaSegmentation( zTiles > 0 );
// load classifier
segmentator.loadClassifier( modelPath.getCanonicalPath() );

// get list of input images
listOfFiles = inputDir.listFiles();
for ( i = 0; i < listOfFiles.length; i++ )
{
    // process only files (do not go into sub-folders)
    if( listOfFiles[ i ].isFile() )
    {
        // try to read file as image
        image = IJ.openImage( listOfFiles[i].getCanonicalPath() );
        if( image != null )
        {
            tilesPerDim = new int[ 2 ];
            if( image.getNSlices() > 1 )
            {
                tilesPerDim = new int[ 3 ];
                tilesPerDim[ 2 ] = zTiles;
            }
            tilesPerDim[ 0 ] = xTiles;
            tilesPerDim[ 1 ] = yTiles;

            // apply classifier and get results (0 indicates number of threads is auto-detected)
            result = segmentator.applyClassifier( image, tilesPerDim, 0, getProbs );

            if( !getProbs )
                // assign same LUT as in GUI
                result.setLut( Utils.getGoldenAngleLUT() );

            // save result as TIFF in output folder
            outputFileName = listOfFiles[ i ].getName().replaceFirst("[.][^.]+$", "") + ".tif";
            new FileSaver( result ).saveAsTiff( outputDir.getPath() + File.separator + outputFileName );

            // force garbage collection (important for large images)
            result = null;
            image = null;
            System.gc();
        }
    }
}
// print elapsed time
estimatedTime = System.currentTimeMillis() - startTime;
IJ.log( "** Finished processing folder in " + estimatedTime + " ms **" );
System.gc();
示例:定义自己的特征
尽管可训练分割提供了大量预定义的图像特征,但您可能需要为特定问题定义自己的特征。您可以通过一组简单的说明来完成此操作。这是一个小 Beanshell 脚本,它从终端示例中提取两个特征,并使用它们来训练分类器(有关更多信息,请参阅内联注释):
import ij.IJ;
import ij.ImagePlus;
import ij.ImageStack;
import ij.gui.Roi;
import ij.gui.PolygonRoi;
import ij.plugin.Duplicator;
import ij.process.FloatPolygon;
import ij.process.StackConverter;
import trainableSegmentation.FeatureStack;
import trainableSegmentation.FeatureStackArray;
import trainableSegmentation.WekaSegmentation;
import trainableSegmentation.utils.Utils;

image = IJ.openImage(System.getProperty("ij.dir") + "/samples/clown.jpg");
if (image.getStackSize() > 1)
    new StackConverter(image).convertToGray32();
else
    image.setProcessor(image.getProcessor().convertToFloat());

duplicator = new Duplicator();

// process the image into different stacks, one per feature:
smoothed = duplicator.run(image);
IJ.run(smoothed, "Gaussian Blur...", "radius=20");

medianed = duplicator.run(image);
IJ.run(medianed, "Median...", "radius=10");

// add new feature here (1/2)

// the FeatureStackArray contains a FeatureStack for every slice in our original image
featuresArray = new FeatureStackArray(image.getStackSize());

// turn the list of stacks into FeatureStack instances, one per original
// slice. Each FeatureStack contains exactly one slice per feature.
for ( slice = 1; slice <= image.getStackSize(); slice++) {
    stack = new ImageStack(image.getWidth(), image.getHeight());
    stack.addSlice("smoothed", smoothed.getStack().getProcessor(slice));
    stack.addSlice("medianed", medianed.getStack().getProcessor(slice));

    // add new feature here (2/2) and do not forget to add it with a
    // unique slice label!

    // create empty feature stack
    features = new FeatureStack( stack.getWidth(), stack.getHeight(), false );
    // set my features to the feature stack
    features.setStack( stack );
    // put my feature stack into the array
    featuresArray.set(features, slice - 1);
    featuresArray.setEnabledFeatures(features.getEnabledFeatures());
}

wekaSegmentation = new WekaSegmentation(image);
wekaSegmentation.setFeatureStackArray(featuresArray);

// set examples for class 1 (= foreground) and 0 (= background))
void addExample(int classNum, int slice, float[] xArray, float[] yArray) {
        polygon = new FloatPolygon(xArray, yArray);
        roi = new PolygonRoi(polygon, Roi.FREELINE);
        IJ.log("roi: " + roi);
        wekaSegmentation.addExample(classNum, roi, slice);
}

/*
 * generate these with the macro:
        getSelectionCoordinates(x, y);
        print('new float [] {'); Array.print(x); print('},");
        print('new float [] {'); Array.print(y); print('}");
 */
addExample(1, 1,
        new float [] { 82,85,85,86,87,87,87,88,88,88,88,88,88,88,88,86,86,84,83,82,81,
          80,80,78,76,75,74,74,73,72,71,70,70,68,65,63,62,60,58,57,55,55,
          54,53,51,50,49,49,49,51,52,53,54,55,55,56,56},
        new float [] { 141,137,136,134,133,132,130,129,128,127,126,125,124,123,122,121,
          120,119,118,118,116,116,115,115,114,114,113,112,111,111,111,111,
          110,110,110,110,111,112,113,114,114,115,116,117,118,119,119,120,
         121,123,125,126,128,128,129,129,130
} );
addExample(0, 1,
        new float [] { 167,165,163,161,158,157,157,157,157,157,157,157,158 },
        new float [] { 30,29,29,29,29,29,28,26,25,24,23,22,21 }
);

// train classifier
if (!wekaSegmentation.trainClassifier())
    throw new RuntimeException("Uh oh! No training today.");
// apply classifier to image
output = wekaSegmentation.applyClassifier(image);
// set same LUT as in the plugin GUI
output.setLut( Utils.getGoldenAngleLUT() );
output.show();
示例:配备二进制标签的训练样本
这是 Beanshell 中的一个简单脚本,执行以下操作:
1.它以一幅图像(2D 或堆栈)作为训练输入图像,并以两个值图像作为相应的标签。 2.基于随机选择训练的图像像素训练分类器(在本例中为随机森林,但可以更改)。样本数量(用于训练的像素)也是一个参数,并且对于每个类别都是相同的。
- 将经过训练的分类器评估测试图像(2D 或堆栈)。 ```python #@ ImagePlus(label=”Training image”, description=”Stack or a single 2D image”) image #@ ImagePlus(label=”Label image”, description=”Image of same size as training image containing binary class labels”) labels #@ ImagePlus(label=”Test image”, description=”Stack or a single 2D image”) testImage #@ Integer(label=”Num. of samples”, description=”Number of training samples per class and slice”,value=2000) nSamplesToUse #@OUTPUT ImagePlus prob import ij.IJ; import trainableSegmentation.WekaSegmentation; import hr.irb.fastRandomForest.FastRandomForest;
// starting time startTime = System.currentTimeMillis();
// create Weka segmentator seg = new WekaSegmentation(image);
// Classifier // In this case we use a Fast Random Forest rf = new FastRandomForest(); // Number of trees in the forest rf.setNumTrees(100);
// Number of features per tree
rf.setNumFeatures(0);
// Seed
rf.setSeed( (new java.util.Random()).nextInt() );
// set classifier
seg.setClassifier(rf);
// Parameters
// membrane patch size
seg.setMembranePatchSize(11);
// maximum filter radius
seg.setMaximumSigma(16.0f);
// Selected attributes (image features) enableFeatures = new boolean[]{ true, /* Gaussian_blur / true, / Sobel_filter / true, / Hessian / true, / Difference_of_gaussians / true, / Membrane_projections / false, / Variance / false, / Mean / false, / Minimum / false, / Maximum / false, / Median / false, / Anisotropic_diffusion / false, / Bilateral / false, / Lipschitz / false, / Kuwahara / false, / Gabor / false, / Derivatives / false, / Laplacian / false, / Structure / false, / Entropy / false / Neighbors */ };
// Enable features in the segmentator seg.setEnabledFeatures( enableFeatures );
// Add labeled samples in a balanced and random way seg.addRandomBalancedBinaryData(image, labels, “class 2”, “class 1”, nSamplesToUse);
// Train classifier seg.trainClassifier();
// Apply trained classifier to test image and get probabilities prob = seg.applyClassifier( testImage, 0, true ); // Set output title prob.setTitle( “Probability maps of “ + testImage.getTitle() ); // Print elapsed time estimatedTime = System.currentTimeMillis() - startTime; IJ.log( “** Finished script in “ + estimatedTime + “ ms **” );
# 示例:使用基于颜色的分割进行

以下[Beanshell](/scripting/beanshell)脚本展示了如何使用<a href="https://en.wikipedia.org/wiki/K-means">k-means</a>和两种可能的方案以自动方式分割二维彩色图像或显示:<a href="https://en.wikipedia.org/wiki/CIELAB">CIELab color space</a>和§<a href="https://en.wikipedia.org/wiki/Expectation–maximization_algorithm">expectation maximization</a>(注意:您没有安装Weka的ClassificationViaClustering分类器,请检查[how to install new classifiers via Weka's package manager](/plugins/tws/how-to-install-new-classifiers))。
```python
#@ ImagePlus image
#@ int(label="Num. of clusters", description="Number of expected clusters", value=5) numClusters
#@ int(label="Num. of samples", description="Number of training samples per cluster", value=1000) numSamples
#@ String(label="Clustering method",choices={"SimpleKMeans","EM"}) clusteringChoice
#@OUTPUT ImagePlus output
import ij.IJ;
import ij.ImageStack;
import ij.ImagePlus;
import ij.process.ColorSpaceConverter;
import ij.process.ByteProcessor;
import trainableSegmentation.FeatureStack;
import trainableSegmentation.FeatureStackArray;
import trainableSegmentation.WekaSegmentation;
import weka.clusterers.EM;
import weka.clusterers.SimpleKMeans;
import weka.core.WekaPackageManager;
import weka.core.WekaPackageClassLoaderManager;

// Load WEKA local learning schemes (from user installed packages)
WekaPackageManager.loadPackages( false );

if( image.getType() != ImagePlus.COLOR_RGB )
{
	IJ.error( "Color segmentation by clustering",
		"Error: input image needs to be a color 2D image or stack!" );
	return null;
}

// Color space converter to pass from RGB to Lab
converter = new ColorSpaceConverter();

// Initialize segmentator with the same number of classes as
// expected number of clusters
wekaSegmentation = new WekaSegmentation( image );
for( i=2; i<numClusters; i++ )
	wekaSegmentation.addClass();

// Initialize array of feature stacks (one per slice)
featuresArray = new FeatureStackArray( image.getStackSize() );

for ( slice = 1; slice <= image.getStackSize(); slice++ )
{
	// RGB to Lab conversion
	stack = new ImageStack( image.getWidth(), image.getHeight() );
	lab = converter.RGBToLab( new ImagePlus( "RGB", image.getStack().getProcessor( slice ) ));

	stack.addSlice("a", lab.getStack().getProcessor( 2 ) );
	stack.addSlice("b", lab.getStack().getProcessor( 3 ) );

	// Create empty feature stack
	features = new FeatureStack( stack.getWidth(), stack.getHeight(), false );
	// Set a and b features to the feature stack
	features.setStack( stack );
	// Put feature stack into the array
	featuresArray.set(features, slice - 1);

	// Create uniform labels of each cluster/class.
	// (this information is not used by the clusterer but
	// needed by WEKA).
	pixels = new byte[ image.getWidth() * image.getHeight() ];
	for( i=0; i<pixels.length; i++)
		pixels [ i ] = (byte) ( i % numClusters + 1 );
	labels = new ByteProcessor( image.getWidth(), image.getHeight(), pixels );

	// Add randomly chosen training data in a balanced way
	wekaSegmentation.addRandomBalancedLabeledData( labels, features, numSamples );
}

// Set ClassificationViaClustering classifier to perform clustering
classifier = WekaPackageClassLoaderManager.objectForName( "weka.classifiers.meta.ClassificationViaClustering" );

// Set clusterer as selected by user
clusterer = null;
if( clusteringChoice.equals( "SimpleKMeans" ) )
	clusterer = new SimpleKMeans();
else
	clusterer = new EM();
clusterer.setSeed( (new Random()).nextInt() );
clusterer.setNumClusters( numClusters );
classifier.setClusterer( clusterer );
wekaSegmentation.setClassifier( classifier );

// Train classifier and therefore clusterer
if (!wekaSegmentation.trainClassifier())
	throw new RuntimeException("Uh oh! No training today.");

// Apply classifier based on a,b features to whole image
wekaSegmentation.setFeatureStackArray( featuresArray );
output = wekaSegmentation.applyClassifier( image, featuresArray, 0, false );
output.setDisplayRange( 0, numClusters-1 );
这是一种非常有用的方法来图像分割,其中元素包含非常不同的颜色。让我们看一个使用public image苏木精和伊红(H&E)染色肺组织的示例:
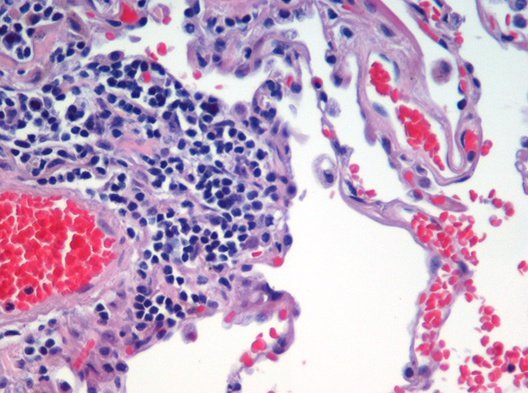
打开图像后,我们可以调用脚本,然后会弹出一个对话框:
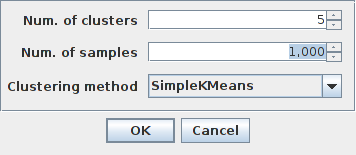
这里我们可以选择期望的像素数量、用于训练的每个像素的样本数量以及关键方法。5个簇、1000个样本和“SimpleKMeans”的默认值涉及5000个像素将用于训练(\(5\times1000=5000\))k均值分类器,生成的图像将是包含[0-4]范围内标签的整数图像。
这将有 3 个集群、2000 个样本和“SimpleKMeans”的脚本的可能输出:
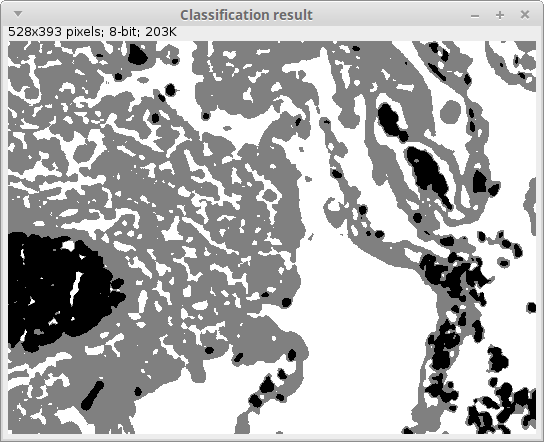
由于随机种子初始化,同样的不同执行之间的实际标签值可能会有所不同。无论如何,血细胞(最初为红色)、细胞核(蓝色紫色)、其他细胞体(粉色)和细胞外空间通常会得到非常合理的分割。

